file: ./content/docs/authentication.mdx
meta: {
"title": "Authentication",
"description": "Learn how authentication works in Dirstarter, including BetterAuth setup, providers, user management, and security"
}
Dirstarter uses [BetterAuth](https://better-auth.com) for authentication, providing a flexible and secure system with multiple authentication methods and role-based access control.
## Core Features
* Magic Link authentication with [Resend integration](/docs/integrations/email)
* Social login providers (Google, GitHub)
* Role-based access control (admin/user)
* Session management
* User management interface
## Setup
The following environment variables are required:
```dotenv title=".env"
BETTER_AUTH_SECRET=your_secret_key // Random string
BETTER_AUTH_URL=http://localhost:3000
```
> You can generate a random string for the secret key using `openssl rand -base64 32`.
For every OAuth provider you want to use, you need to set the `clientId` and `clientSecret` provider variables.
```dotenv title=".env"
# Google OAuth
AUTH_GOOGLE_ID=your_google_client_id
AUTH_GOOGLE_SECRET=your_google_client_secret
```
Follow the [BetterAuth documentation](https://www.better-auth.com/docs/authentication/google) for more information where to find the clientId and clientSecret.
### Basic Configuration
Authentication is configured in `lib/auth.ts`:
```ts title="lib/auth.ts"
export const auth = betterAuth({
database: prismaAdapter(db, {
provider: "postgresql",
}),
socialProviders: {
google: {
clientId: env.AUTH_GOOGLE_ID,
clientSecret: env.AUTH_GOOGLE_SECRET,
},
},
account: {
accountLinking: {
enabled: true,
},
},
plugins: [
magicLink({
sendMagicLink: async ({ email, url }) => {
// Email sending logic
},
}),
admin(),
// Add other plugins here
],
})
```
For a full list of available configuration options, plugins and providers see the [BetterAuth documentation](https://better-auth.com/docs/).
## Authentication Methods
By default, Dirstarter includes 2 authentication methods: Magic Link and Google Login.
BetterAuth supports a wide range of authentication methods, including more social providers, email/password, passkeys and more.
### Magic Link
Magic Link authentication allows users to sign in without a password. When a user enters their email, they receive a secure link that automatically logs them in.
```tsx title="components/web/auth/login-form.tsx"
const handleSignIn = ({ email }: z.infer) => {
signIn.magicLink({
email,
callbackURL,
fetchOptions: {
onSuccess: () => {
router.push(`/auth/verify?email=${email}`)
},
onError: ({ error }) => {
toast.error(error.message)
},
},
})
}
```
### Social Login
Social login is supported through OAuth providers. Currently configured for Google:
```tsx title="components/web/auth/login-button.tsx"
const handleSignIn = () => {
signIn.social({
provider,
callbackURL,
fetchOptions: {
onRequest: () => {
setIsPending(true)
},
onError: ({ error }) => {
toast.error(error.message)
},
},
})
}
```
## User Roles
Dirstarter implements two user roles:
* `admin`: Full access to all features and user management
* `user`: Standard user access
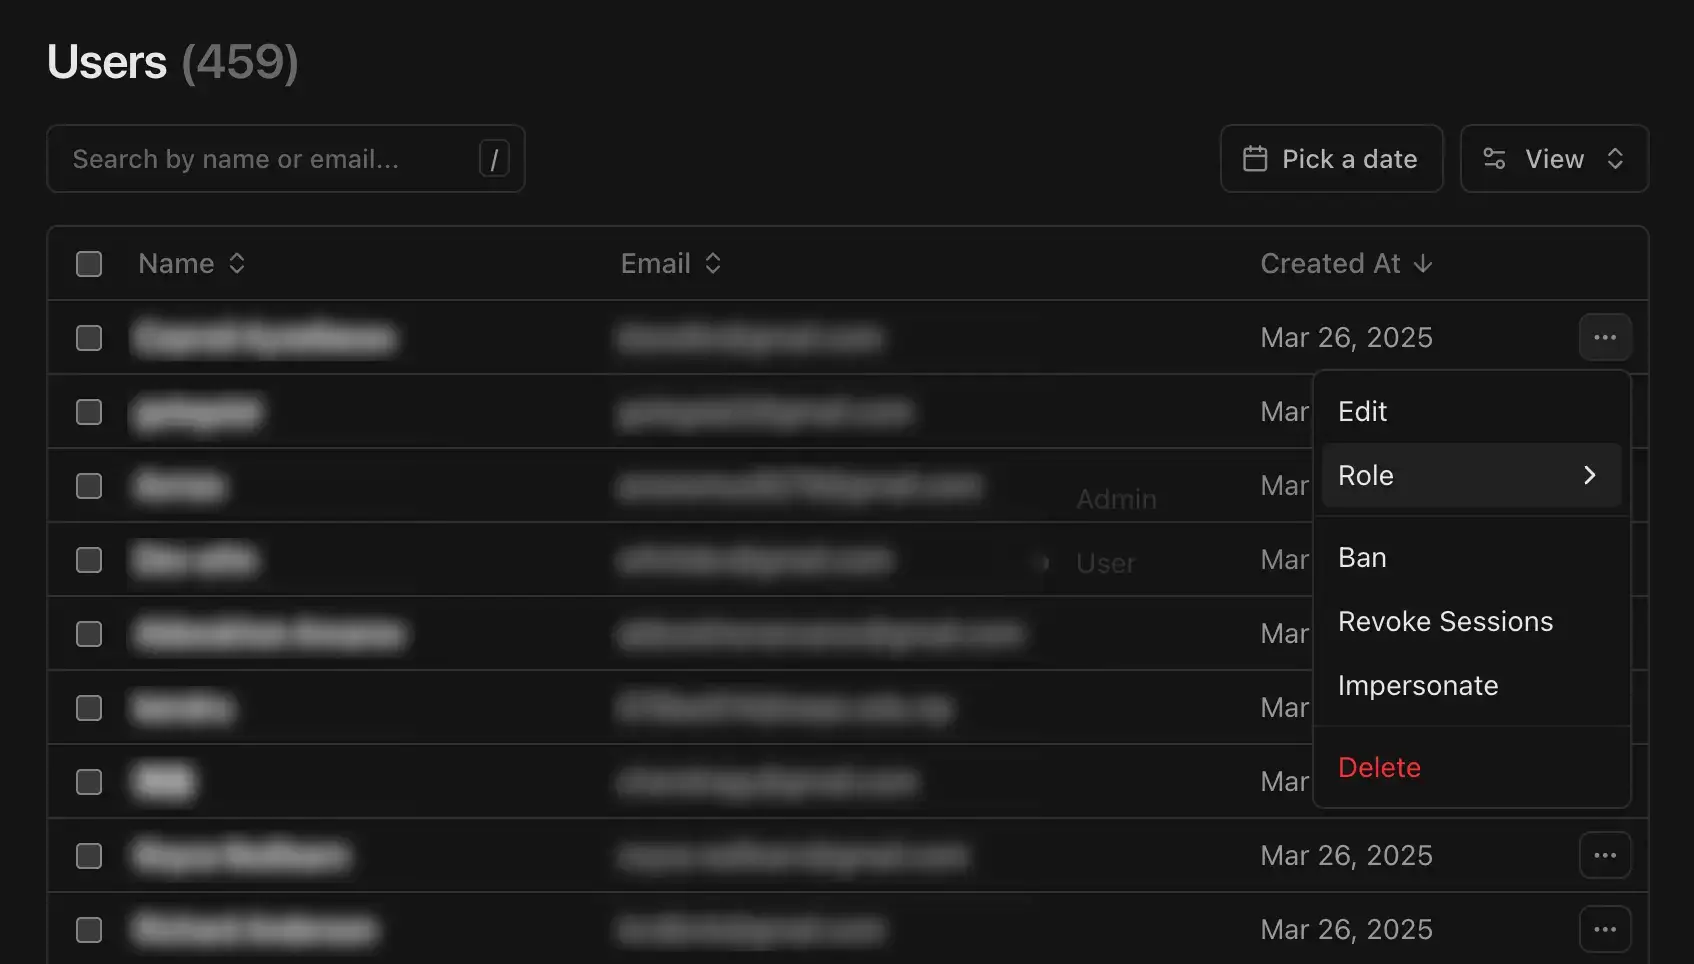
## User Management
Admins have access to various user management actions:
* Edit user details
* Change user roles
* Ban/unban users
* Revoke user sessions
* Delete users
## Protecting Routes and Actions
### Route Protection
Use middleware to protect routes:
```ts title="middleware.ts"
export const config = {
matcher: ["/admin/:path*", "/auth/:path*"],
}
```
Middleware auth check should not be the only protection for your routes. You should also protect routes in the route handler.
Protecting a page is done by checking the session in the page.
```tsx title="app/admin/page.tsx"
import { auth } from "~/lib/auth"
import { redirect } from "next/navigation"
import { headers } from "next/headers"
export default async function AdminPage({ children }: { children: React.ReactNode }) {
const session = await auth.api.getSession({ headers: await headers() })
if (session?.user.role !== "admin") {
redirect("/auth/login")
}
return
{children}
}
```
### Action Protection
There are 2 predefined server actions procedures that can be used to protect actions:
* `userProcedure`: Protects actions that require a user to be authenticated
* `adminProcedure`: Protects actions that require a user to be an admin
```ts title="lib/safe-actions.ts"
export const userProcedure = createProcedure().handler(async () => {
const session = await auth.api.getSession({ headers: await headers() })
if (!session?.user) {
throw new Error("User not authenticated")
}
return { user: session.user }
})
export const adminProcedure = createProcedure(userProcedure).handler(async ({ ctx }) => {
if (ctx.user.role !== "admin") {
throw new Error("User not authorized")
}
return { user: ctx.user }
})
```
You can also create your own procedures and protect them with the same logic. For more information on how to create and use procedures, see the [Zod Safe Actions documentation](https://zsa.vercel.app).
To use the procedures in your server actions, create them with the `createServerAction` function from ZSA:
```tsx title="actions/create-tool.ts"
export const createTool = userProcedure
.createServerAction()
.input(z.object({
name: z.string(),
description: z.string(),
}))
.handler(async ({ input, ctx: { user } }) => {
// Create a new tool
const tool = await db.tool.create({
data: {
name: input.name,
description: input.description,
ownerId: user.id, // You can be certain that the user is authenticated
},
})
return tool
})
```
## Client-Side Usage
### Session Management
```tsx title="components/auth-button.tsx"
'use client'
import { useSession, signIn, signOut } from '~/lib/auth-client'
export function AuthButton() {
const { data: session, isPending } = useSession()
if (isPending) {
return
Loading...
}
if (session) {
return (
)
}
return (
)
}
```
### Admin Checks
```tsx
const { data: session } = useSession()
if (session?.user.role === 'admin') {
// Show admin UI
}
```
## Email Templates
Magic link emails use React Email for beautiful, responsive templates:
```tsx title="emails/login-link.tsx"
const EmailLoginLink = ({ url, ...props }: EmailProps) => {
return (
Welcome to {config.site.name}!Please click the magic link below to sign in to your account.Sign in to {config.site.name}or copy and paste this URL into your browser:{url}
)
}
```
Always implement proper authorization checks on both the client and server to secure your application.
file: ./content/docs/automation.mdx
meta: {
"title": "Automation",
"description": "Learn how Dirstarter uses AI and third-party services for automating directory content generation"
}
Dirstarter uses AI and third-party services for automating directory content generation.
## How It Works
We use a set of tools to automate the content generation. This **speeds up the process** and **ensures a consistent output**.
Here's a step-by-step guide on how the automation works:
A tool with URL is added to the directory
Admin reviews the tool and schedules it for publishing
[Jina AI](https://jina.ai) scrapes the website and generates a structured JSON object
[Google Gemini](https://gemini.google.com) generates structured data and categorises the content
Screenshot of the website is taken using [Screenshot API](/docs/integrations/media)
Favicon is automatically extracted from the website
The generated content is saved to your database
## Setup
In order to use the automation, you need to set up the following:
### Jina AI
We use [Jina AI](https://jina.ai/reader) to scrape the website and generate a structured JSON object. They provide a very generous free tier without an API key, but if you run out of credits, you can create a API key to get 1,000,000 free tokens.
```dotenv title=".env"
JINA_API_KEY=your_api_key
```
### Google Gemini
Create a [Google Gemini](https://aistudio.google.com/app/apikey) account and add the following environment variable:
> We chose Gemini as a default model because it's the most cost-effective option. If you need more powerful model, you can use [Claude](https://claude.ai) or any other LLM supported by [Vercel AI SDK](https://sdk.vercel.ai).
```dotenv title=".env"
GEMINI_API_KEY=your_api_key
```
## Customizing Generation
You can customize the generation by:
1. Modifying the system prompt in the `/api/ai/generate-content` function
2. Adjusting the schema to include additional fields
3. Changing the temperature parameter (lower for more consistent results)
file: ./content/docs/blog.mdx
meta: {
"title": "Blog and Static Pages",
"description": "Learn how to use Content Collections for managing blog posts and static MDX content in your directory website."
}
Dirstarter uses [Content Collections](https://content-collections.dev/) for managing blog posts and static MDX content. This system provides a type-safe way to handle markdown content with frontmatter validation and MDX support.
## Configuration
The core configuration is defined in `content-collections.ts`:
```ts title="content-collections.ts"
import { defineCollection, defineConfig } from "@content-collections/core"
import { type Options, compileMDX } from "@content-collections/mdx"
import rehypeAutolinkHeadings from "rehype-autolink-headings"
import rehypeSlug from "rehype-slug"
const mdxOptions: Options = {
rehypePlugins: [rehypeSlug, rehypeAutolinkHeadings],
}
const posts = defineCollection({
name: "posts",
directory: "content/posts",
include: "**/*.md",
schema: z => ({
title: z.string(),
description: z.string(),
image: z.string().optional(),
publishedAt: z.string(),
updatedAt: z.string().optional(),
author: z
.object({
name: z.string(),
image: z.string(),
twitterHandle: z.string(),
})
.optional(),
}),
transform: async (data, context) => {
const content = await compileMDX(context, data, mdxOptions)
return { ...data, content }
},
})
export default defineConfig({
collections: [posts],
})
```
## Blog Post Structure
Blog posts are stored in `content/posts/` directory as MDX files. Each post requires specific frontmatter fields:
```markdown title="content/posts/example.md"
---
title: "The Rise of Edge Computing in Modern Web Development"
description: "Explore how edge computing is revolutionizing web development..."
image: "/content/example.webp"
publishedAt: 2025-03-29
author:
name: John Doe
image: "/authors/john-doe.webp"
twitterHandle: "john-doe"
---
```
## Adding New Content Collections
To add a new content collection for static MDX content:
Define a new collection in `content-collections.ts`:
```ts title="content-collections.ts"
const docs = defineCollection({
name: "docs",
directory: "content/docs",
include: "**/*.md",
schema: z => ({
title: z.string(),
description: z.string(),
category: z.string(),
}),
transform: async (data, context) => {
const content = await compileMDX(context, data, mdxOptions)
return { ...data, content }
},
})
export default defineConfig({
collections: [posts, docs],
})
```
Create corresponding directory structure:
```
content/
├── posts/ # Blog posts
└── docs/ # Documentation pages
```
Access the content in your components:
```ts title="app/blog/page.tsx"
import { allDocs } from "content-collections"
export default function DocsPage() {
return (
{allDocs.map(doc => (
{doc.title}
{doc.description}
{/* Render doc.content */}
))}
)
}
```
## Related Resources
* [Content Collections Documentation](https://content-collections.dev/)
* [MDX Documentation](https://mdxjs.com/)
* [Zod Schema Validation](https://zod.dev/)
file: ./content/docs/content.mdx
meta: {
"title": "Content Management",
"description": "Learn about the content management system and workflow in Dirstarter"
}
Dirstarter provides a robust content management system that handles both user submissions and admin-created content. This guide explains the complete content workflow and available features.
## Content Workflow
### User Submissions
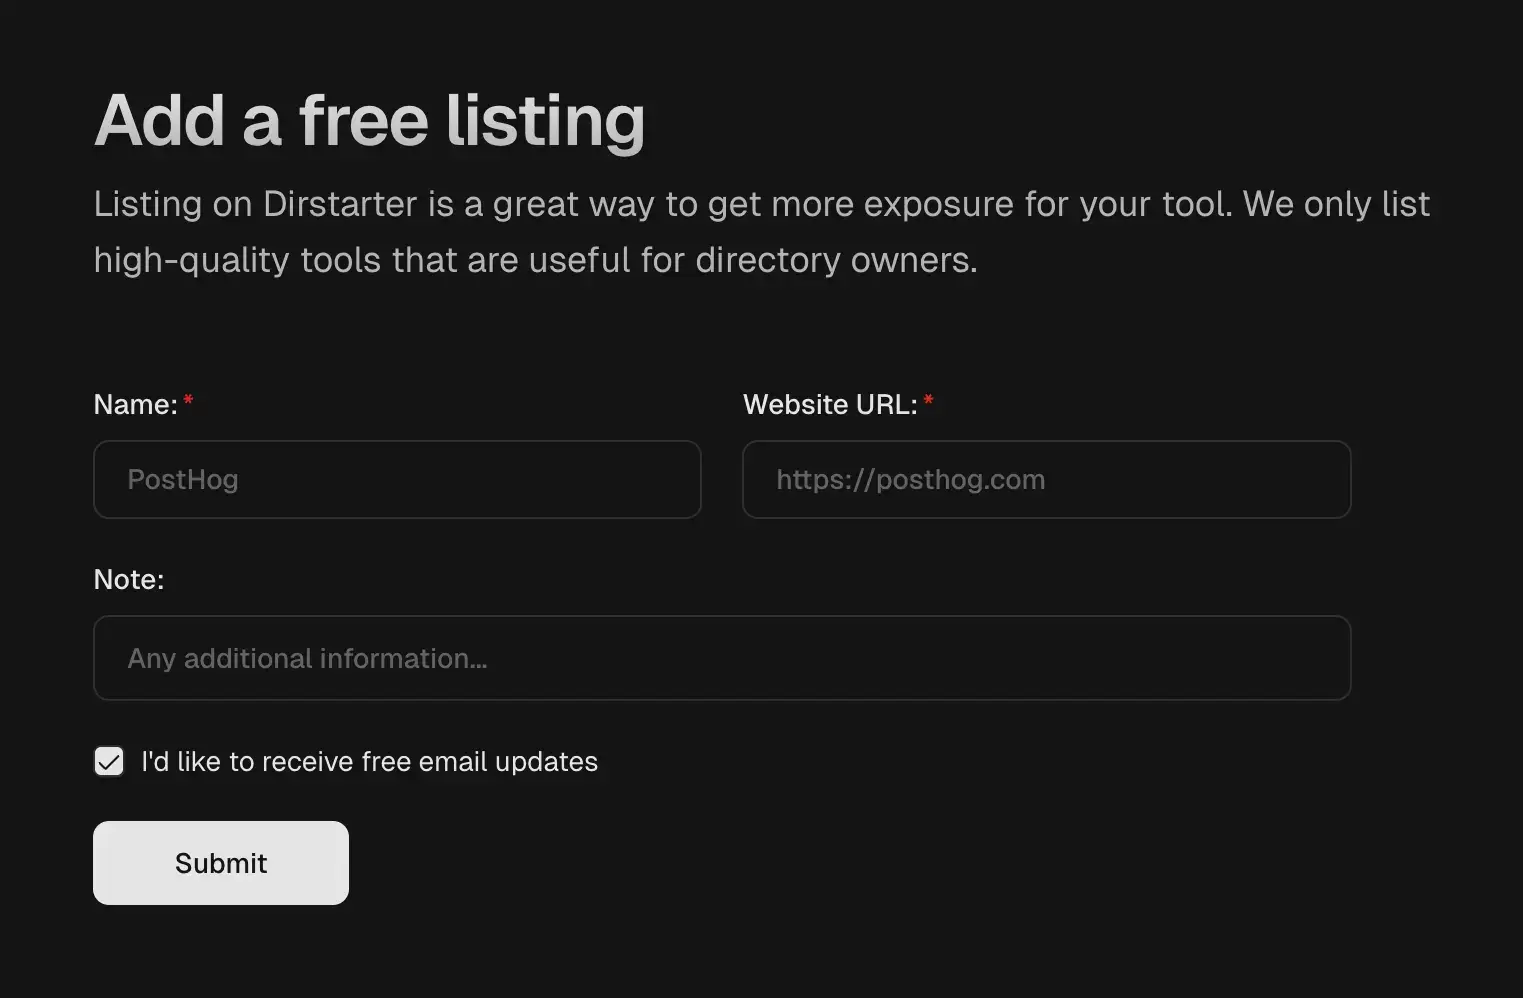
Users can submit new tools through the submission form. Each submission includes:
* Tool details (name, description, URL)
* Submitter details (name, email)
### Admin Review Process
When a tool is submitted:
* It appears in the admin dashboard under "Draft"
* If marked as expedited, admins receive immediate notifications
* Admins can review and accept or delete submissions
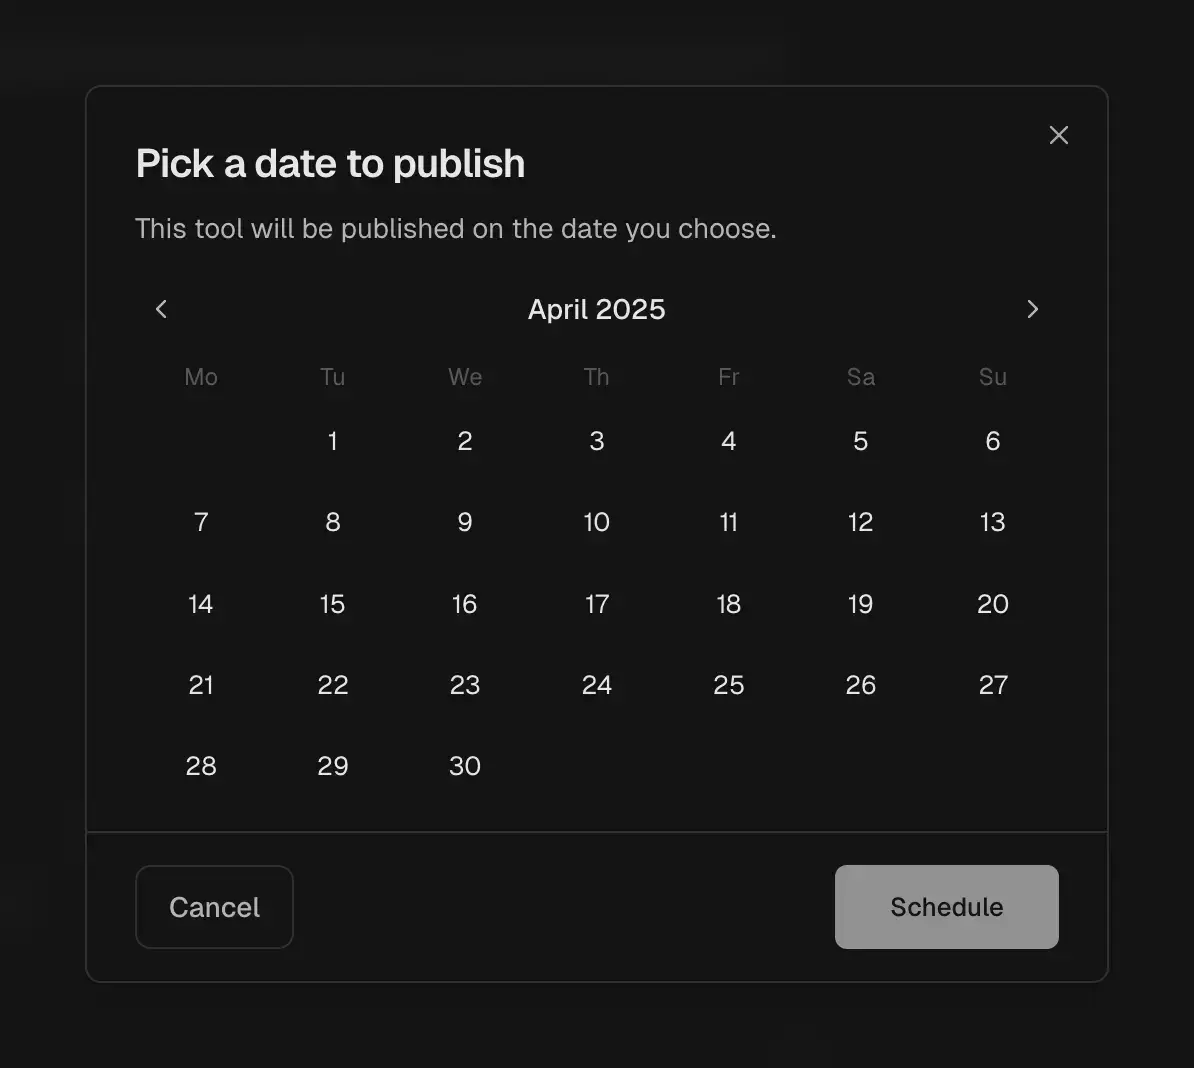
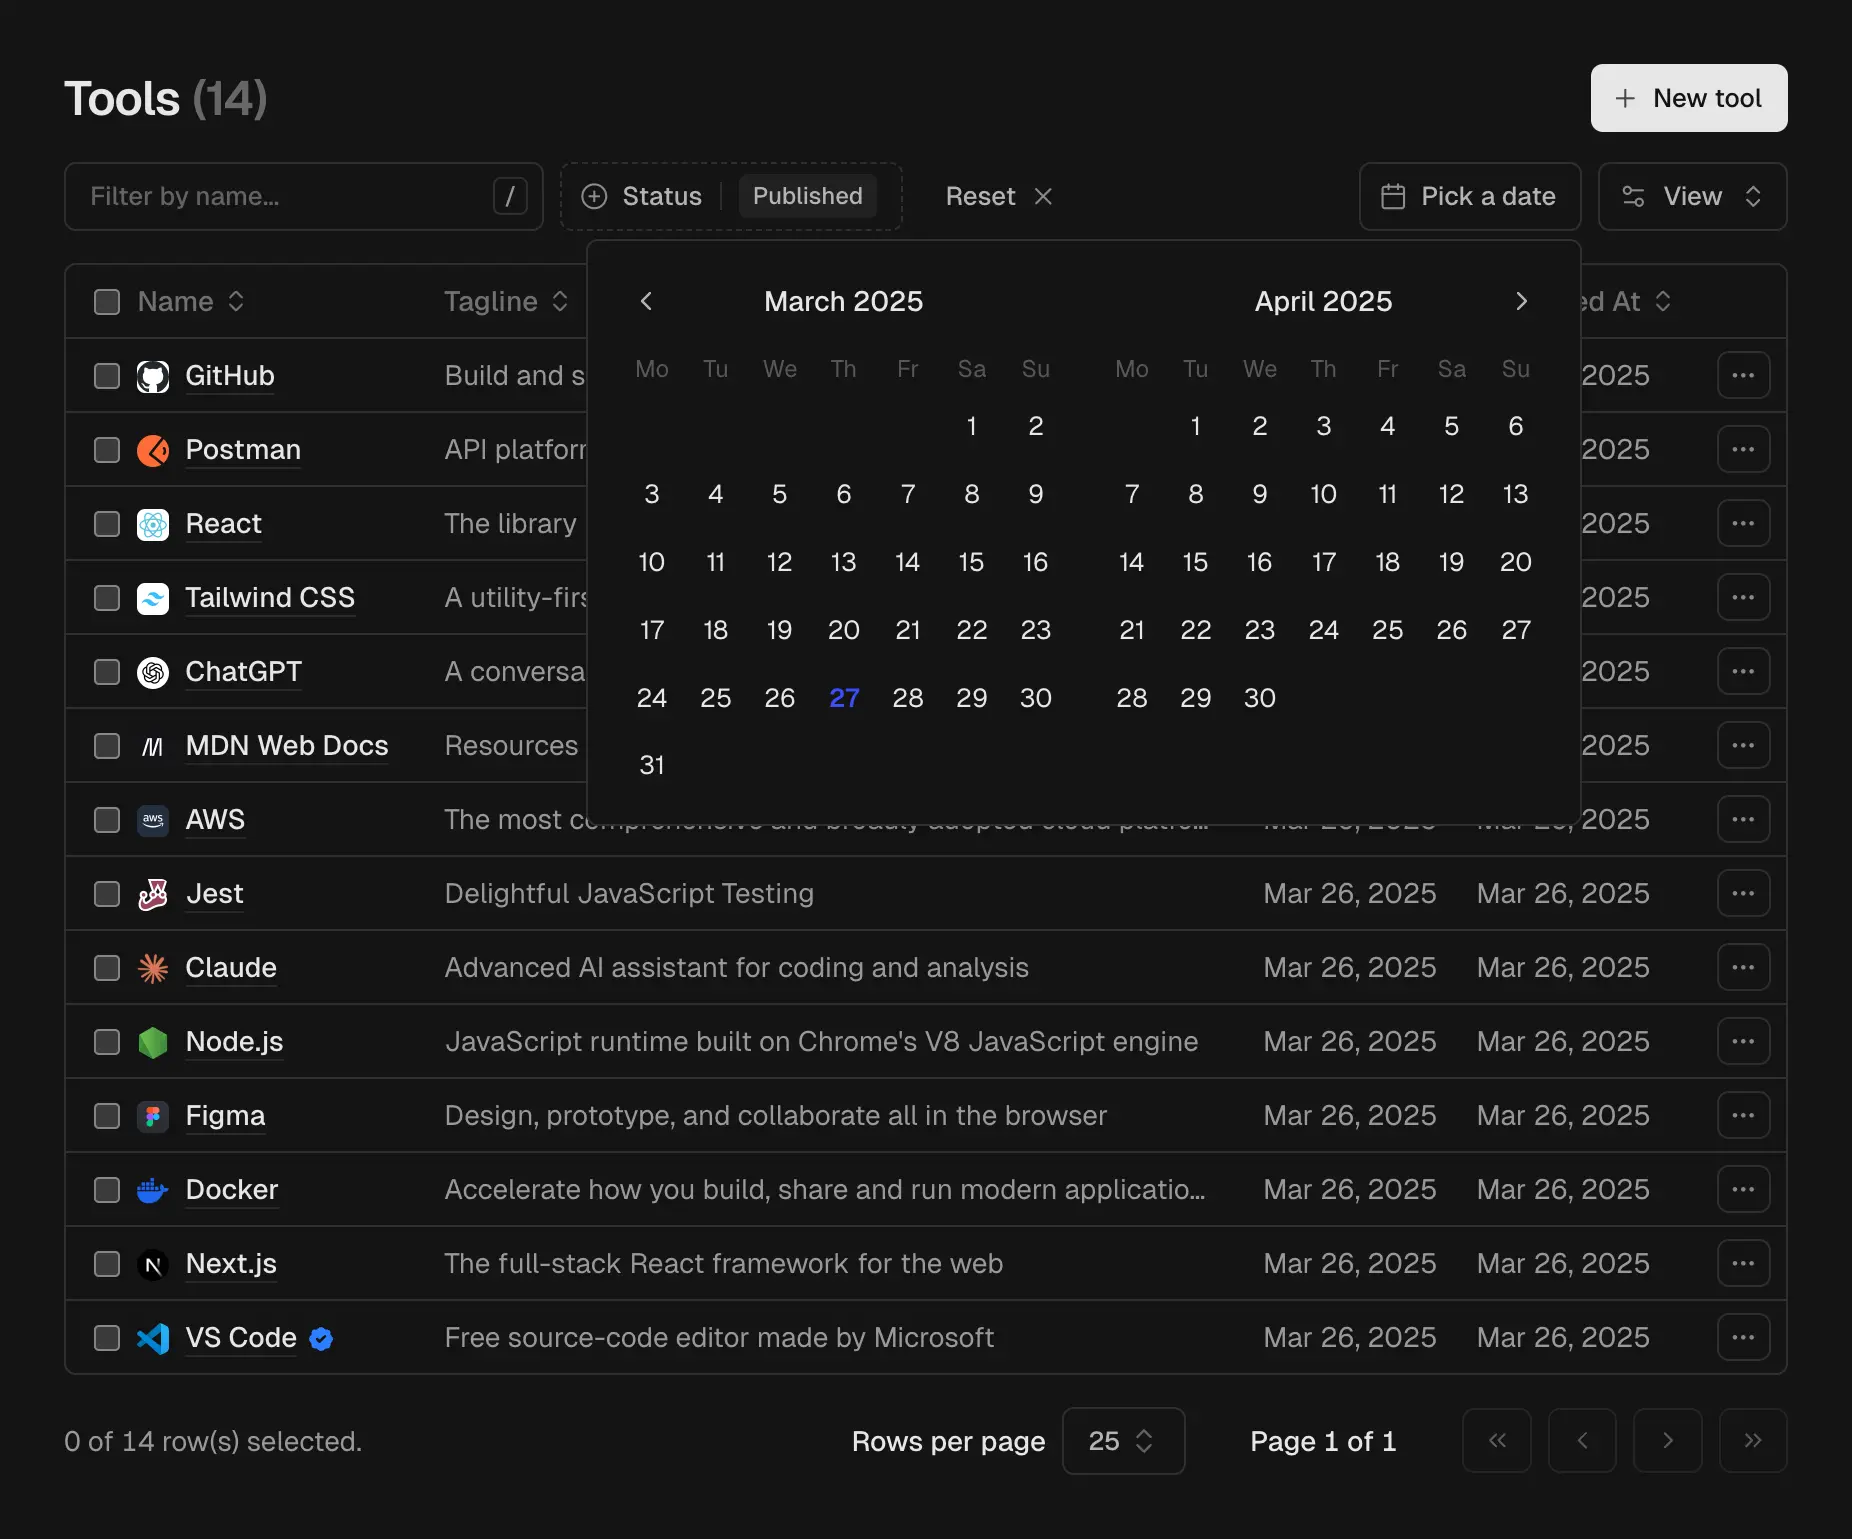
### Content Scheduling
Once approved, admins can:
* Schedule the content for future publication
* Set publication date and time
* Add final touches to the content
* Preview how it will appear on the site
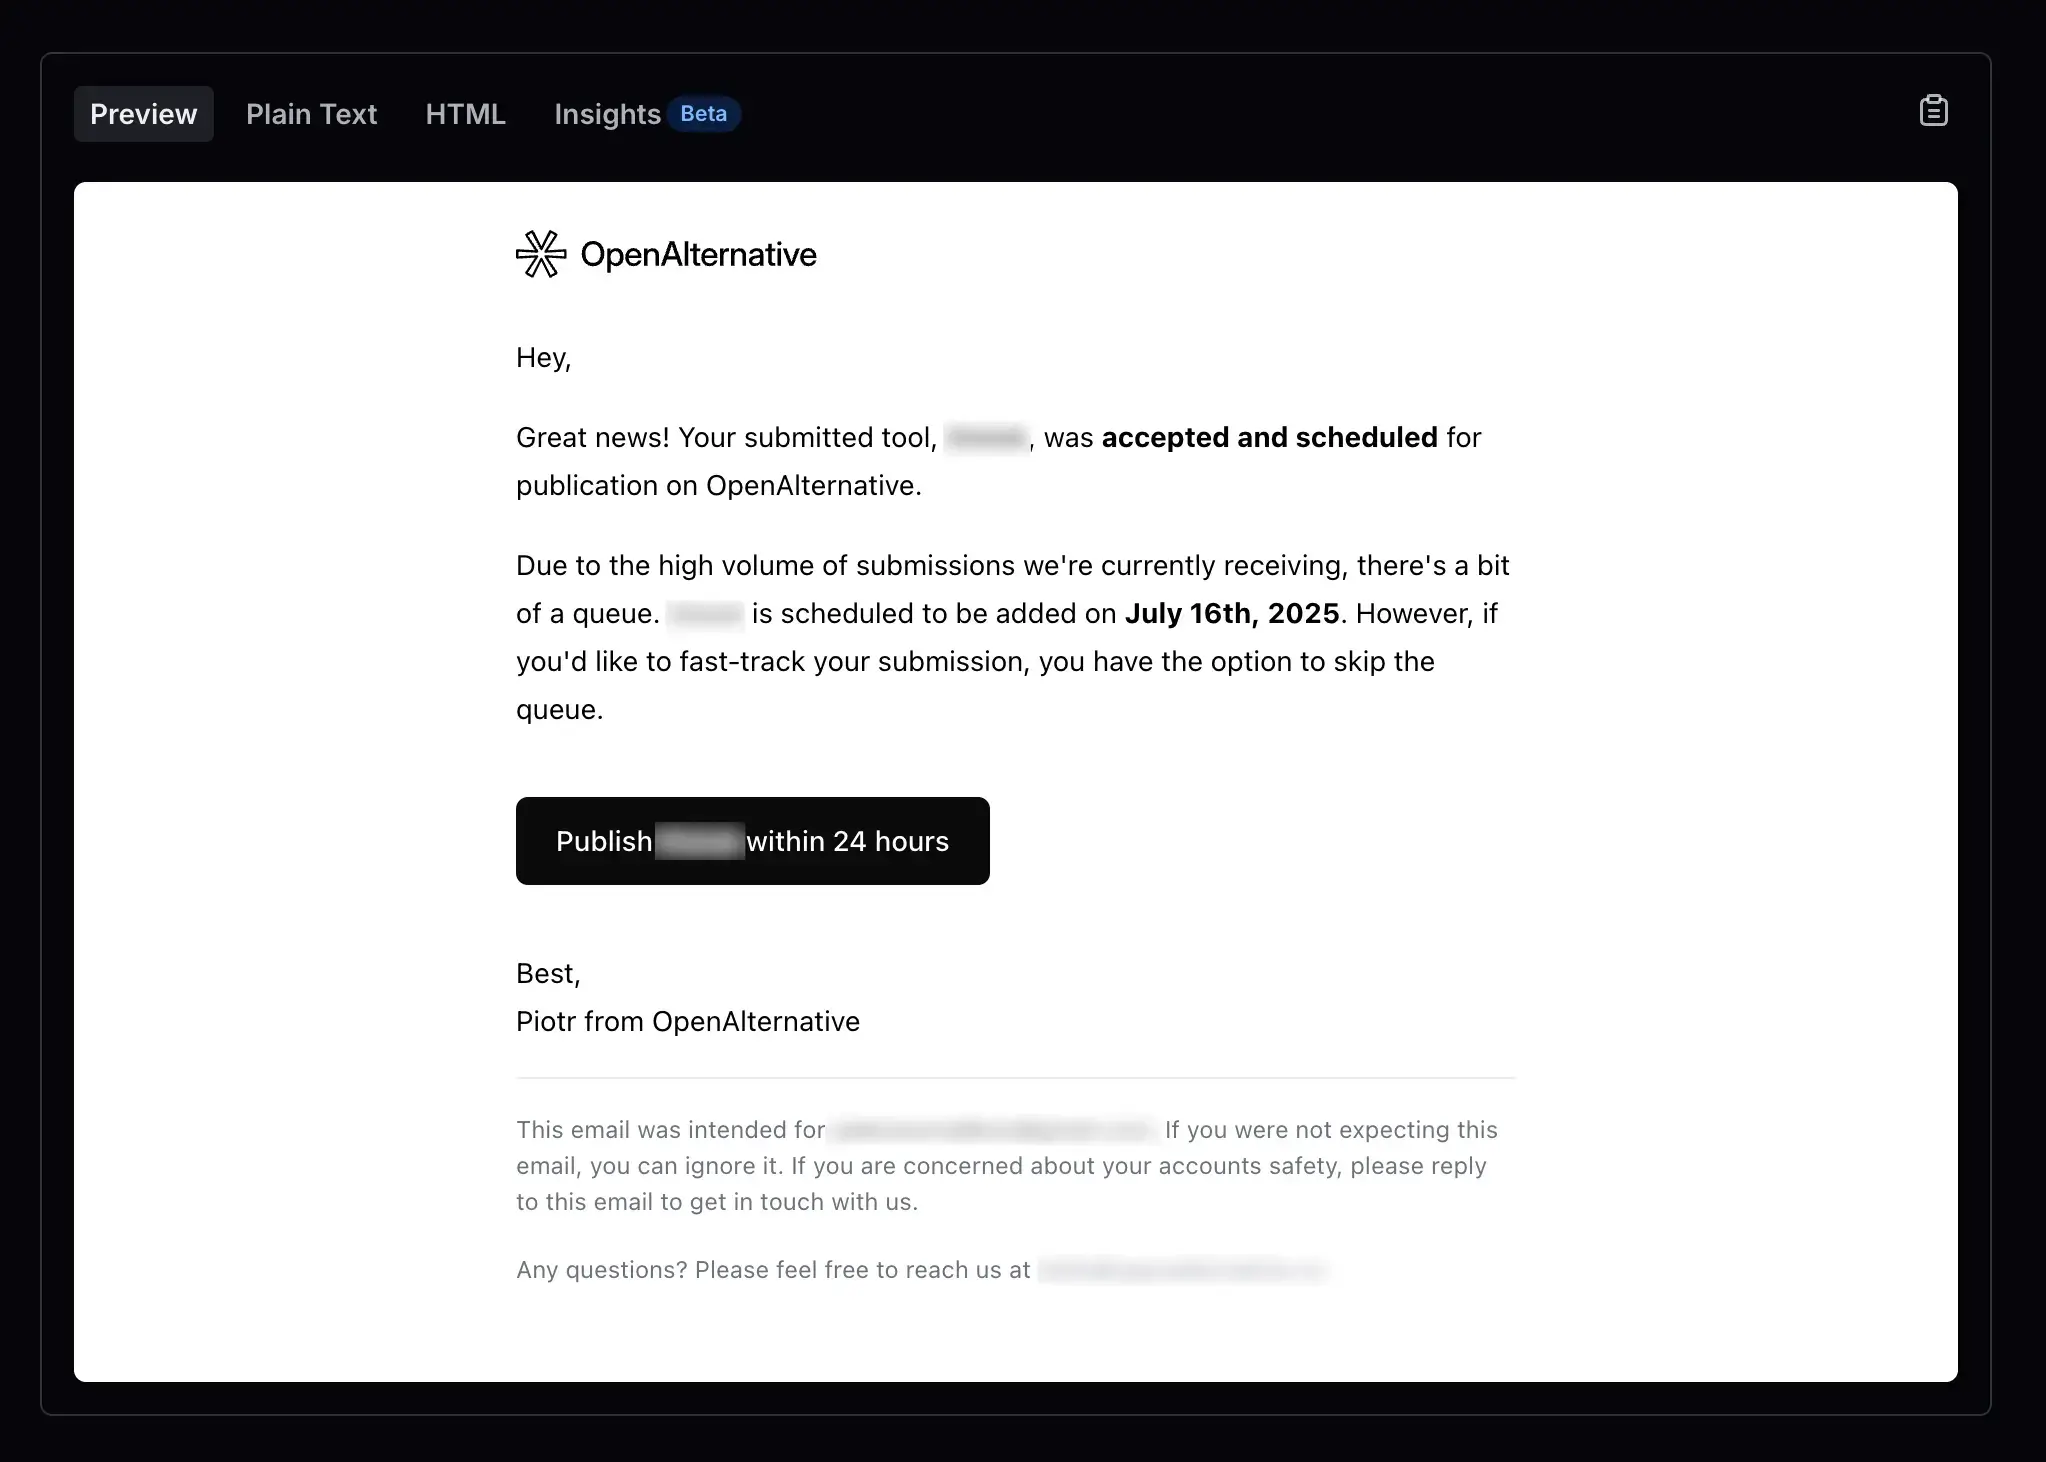
* Notify the submitter by email with a publication date and a link to skip the queue.
### Automated Processing
The system is capable of automatically processing submissions. Once a draft is created, you can generate a high-quality content and media for it.
* High-quality AI generated content based on the scraped content
* Screenshots generated using [ScreenshotOne](https://kulp.in/screenshotone)
* Optimized favicons via Google Favicon API

### Automated Publication
At the scheduled time:
* A [cron job](/docs/cron-jobs) automatically publishes the content
* Content becomes immediately visible on the site
* [Sitemap](/docs/seo#sitemap-generation) is updated and cache is invalidated
* [Email](/docs/integrations/email) is sent to the submitter with a link to the published content.
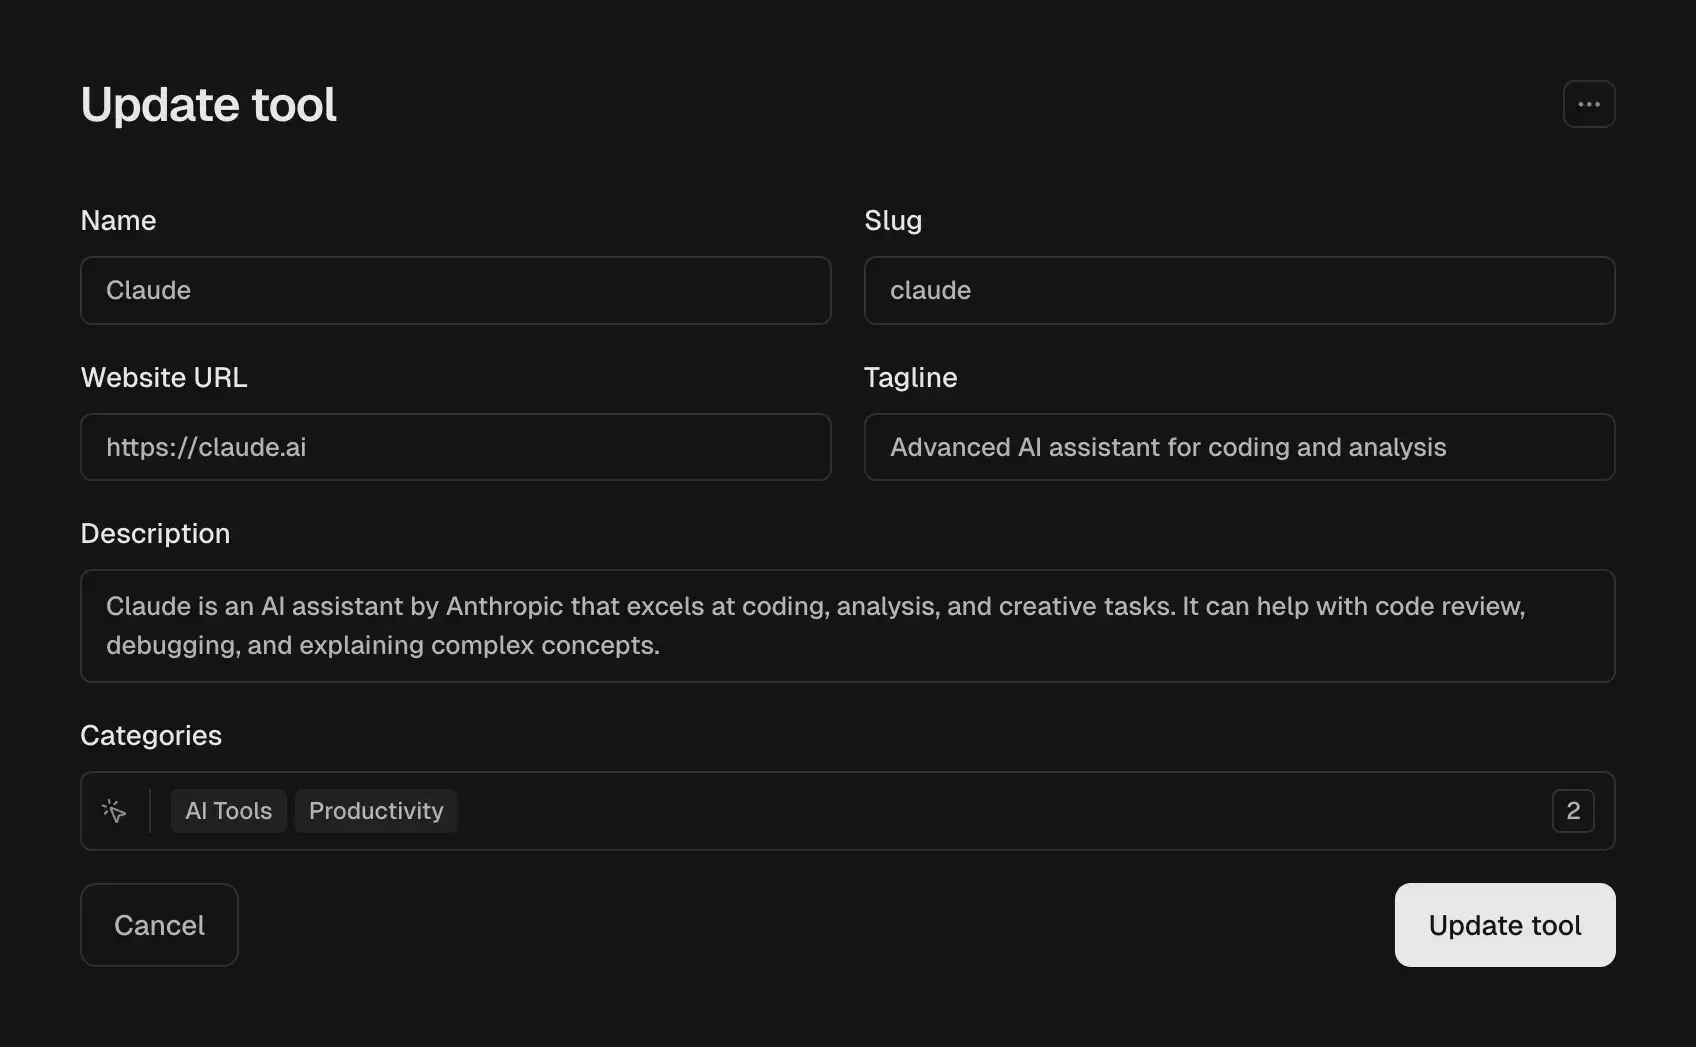
## Manual Content Management
Admins can also create and manage content directly through the admin panel. You can **structure everything hierarchically**, make certain items stand out as **featured**, and create clear relationships between different pieces of content.
Our admin interface is packed with **sophisticated data tables** that make managing content feel like a walk in the park. You can **filter and sort** your way through content, take **quick actions** right from the table, and handle **bulk operations** without breaking a sweat. Even with tons of content, you'll stay in control with our **intuitive design** that makes everything just work.
file: ./content/docs/cron-jobs.mdx
meta: {
"title": "Cron Jobs",
"description": "Learn how to use cron jobs in Dirstarter to automate tasks"
}
Dirstarter recommends hosting your project on Vercel for the best experience. We provide a **pre-configured cron job** for publishing tools on schedule. [Vercel offers](https://vercel.com/docs/cron-jobs) up to 2 cron jobs running in the Hobby plan (free tier) and 40 jobs per month in the Pro plan.
It is by far the easiest way to set up automated publishing on schedule, but you can also use any other cron job service you want. A pretty popular, free service for cron jobs is [cron-job.org](https://cron-job.org/).
## Publish Tools Job
The publish tools job is a cron job that publishes scheduled content. It is configured to be triggered every day at midnight.
```json title="vercel.json"
{
"crons": [
{
"path": "/api/cron/publish-tools",
"schedule": "0 0 * * *" // Every day at midnight
}
]
}
```
> You can use [crontab guru](https://crontab.guru/) to generate a desired cron job schedule.
file: ./content/docs/deployment.mdx
meta: {
"title": "Deployment",
"description": "Learn how to deploy your Dirstarter project to Vercel"
}
Dirstarter is built with Next.js, which means you can deploy it to any platform that supports Next.js applications. Since it is a framework built by Vercel, you will get the best developer experience and performance when deploying to [Vercel](https://vercel.com).
This guide will walk you through the deployment process for Vercel. We'll be adding more deployment guides for other platforms in the future.
## Prerequisites
Before deploying your Dirstarter project, make sure you have:
1. A Git repository with your project
2. An account on [Vercel](https://vercel.com)
3. Your project's [environment variables](/docs/environment-setup) configured for production
## Deployment Steps
Push your code to a Git repository (GitHub, GitLab, or Bitbucket)
Go to [Vercel Dashboard](https://vercel.com/dashboard) and click "Add New Project"
Import your Git repository
Configure your project settings:
* Framework Preset: Next.js
* Build Command: `npm run build` (or `yarn build` if using Yarn)
* Output Directory: `.next`
* Install Command: `npm install` (or `yarn install`)
> You can leave the default settings if you're not sure what to do.
Add your [environment variables](/docs/environment-setup):
```dotenv
DATABASE_URL="your_database_url"
BETTER_AUTH_SECRET="your_secret"
BETTER_AUTH_URL="your_vercel_url"
...
```
Click "Deploy" and your project will be deployed.
## Automatic Deployments
Vercel automatically deploys your application when you:
* Push to the main branch
* Create a new pull request
* Push to a branch with a preview deployment enabled
Every pull request gets a unique **preview URL**, making it easy to test changes before merging to production.
## Custom Domain
1. Go to your project settings in Vercel
2. Navigate to the "Domains" section
3. Add your custom domain
4. Follow the DNS configuration instructions
file: ./content/docs/environment-setup.mdx
meta: {
"title": "Environment Setup",
"description": "Configure environment variables for your Dirstarter application",
"icon": "LockOpen"
}
Dirstarter requires several environment variables to function properly. This guide explains how to set them up.
## Setup
Create a `.env` file in the root directory of your project. You can copy the example file as a starting point:
```bash title="terminal"
cp .env.example .env
```
Never commit your `.env` file to version control. It contains sensitive information that should be kept private.
## Environment Variables
### Core Configuration
| Variable | Description |
| ------------------------ | --------------------------------------------------------------------------- |
| `NEXT_PUBLIC_SITE_URL` | The public URL of your site (e.g., `http://localhost:3000` for development) |
| `NEXT_PUBLIC_SITE_EMAIL` | The contact email for your site |
### Cron Jobs
Learn how to set up cron jobs in the [Cron Jobs](/docs/cron-jobs) guide.
| Variable | Description |
| ------------- | ---------------------------------------- |
| `CRON_SECRET` | A random string used to secure cron jobs |
### Database
Learn how to set up a database in the [Database Setup](/docs/database/prisma) guide.
| Variable | Description |
| -------------- | ---------------------------------- |
| `DATABASE_URL` | PostgreSQL database connection URL |
### Authentication
Learn how to set up authentication in the [Authentication](/docs/authentication) guide.
| Variable | Description |
| -------------------- | ----------------------------------------------------- |
| `BETTER_AUTH_SECRET` | A random string used to hash tokens and sign cookies |
| `BETTER_AUTH_URL` | The URL of your site (same as `NEXT_PUBLIC_SITE_URL`) |
| `AUTH_GOOGLE_ID` | Google OAuth client ID |
| `AUTH_GOOGLE_SECRET` | Google OAuth client secret |
### Redis
Learn how to set up Redis in the [Rate Limiting](/docs/integrations/rate-limiting) guide.
| Variable | Description |
| ----------------------------- | ---------------- |
| `REDIS_REST_URL` (optional) | Redis REST URL |
| `REDIS_REST_TOKEN` (optional) | Redis REST token |
### Email Service
Learn how to set up an Resend email service in the [Email](/docs/integrations/email) guide.
| Variable | Description |
| --------------------- | ---------------------------------------------- |
| `RESEND_API_KEY` | API key for Resend email service |
| `RESEND_SENDER_EMAIL` | Default sender email address |
| `RESEND_AUDIENCE_ID` | Audience ID for Resend marketing email service |
### Storage
Learn how to set up a S3 storage service in the [Storage](/docs/integrations/storage) guide.
| Variable | Description |
| ---------------------- | ----------------------------- |
| `S3_BUCKET` | Name of your S3 bucket |
| `S3_REGION` | AWS region for your S3 bucket |
| `S3_ACCESS_KEY` | AWS access key ID |
| `S3_SECRET_ACCESS_KEY` | AWS secret access key |
### Analytics
Learn how to set up an analytics service in the [Analytics](/docs/integrations/analytics) guide.
| Variable | Description |
| ------------------------------ | ---------------------- |
| `NEXT_PUBLIC_POSTHOG_HOST` | PostHog instance URL |
| `NEXT_PUBLIC_POSTHOG_API_KEY` | PostHog API key |
| `NEXT_PUBLIC_PLAUSIBLE_DOMAIN` | Your Plausible domain |
| `NEXT_PUBLIC_PLAUSIBLE_URL` | Plausible instance URL |
| `PLAUSIBLE_API_KEY` | Plausible API key |
### AI & Web Scraping
Learn how to set up an AI and web scraping service in the [Automation](/docs/automation) guide or use the [Media](/docs/integrations/media) guide.
| Variable | Description |
| ------------------------------ | ------------------------------------- |
| `GOOGLE_GENERATIVE_AI_API_KEY` | Google Gemini API key for AI features |
| `JINA_API_KEY` (optional) | Jina API key for web scraping |
| `SCREENSHOTONE_ACCESS_KEY` | ScreenshotOne API key |
### Payments
Learn how to set up a payment service in the [Payments](/docs/integrations/payments) guide.
| Variable | Description |
| ----------------------- | ----------------------------- |
| `STRIPE_SECRET_KEY` | Stripe secret key |
| `STRIPE_WEBHOOK_SECRET` | Stripe webhook signing secret |
## Type-Safe Validation
Dirstarter uses the T3 Env package for type-safe environment variable validation. The validation is configured in `env.ts` and ensures that:
* All required environment variables are present
* Variables have the correct type (string, number, etc.)
* URLs are properly formatted
* Email addresses are valid
* No empty strings are allowed (they're treated as undefined)
To skip validation during builds (useful for Docker), set `SKIP_ENV_VALIDATION` flag:
```package-install title="Terminal"
npm run build SKIP_ENV_VALIDATION=1
```
## Environment-Specific Variables
### Development Environment
For development, you can use local services or development credentials:
```dotenv title=".env"
NEXT_PUBLIC_SITE_URL="http://localhost:3000"
BETTER_AUTH_URL="http://localhost:3000"
```
### Production Environment
For production, use secure, production-ready services and ensure all required variables are set with proper values.
## Verifying Your Environment
To verify that your environment variables are correctly set up, run:
```package-install title="Terminal"
npm run dev
```
If everything is configured correctly, your application should start without any environment-related errors.
## What's Next?
Now that your environment is set up, learn how to create your first directory entry in the [First Steps](/docs/first-steps) guide.
file: ./content/docs/first-steps.mdx
meta: {
"title": "First Steps",
"description": "Populate your directory with demo data and add your own tools",
"icon": "WandSparkles"
}
Now that you have Dirstarter installed and configured, let's start with populating your directory with some tools.
## Seeding the Database
Dirstarter comes with a default seed data that you can use to jumpstart your directory. This is the easiest way to quickly see what Dirstarter can do and how it works.
```package-install title="Terminal"
npm run db:seed
```
That's it! You should now have some tools already created and ready to go.
If for some reason demo content is not to your liking, you can can [modify the seed data](/docs/database/prisma#customizing-seed-data) or [import your own from a CSV file](/docs/database/prisma#seeding-from-csv).
## Adding New Tools
Demo content is great, but you'll probably want to add your own tools to your directory. Let's walk through the process of adding a new tool to your directory.
Start your development server if it's not already running:
```package-install title="Terminal"
npm run dev
```
Navigate to `http://localhost:3000/admin` in your browser
Log in with the admin credentials:
* If you're using the default seed data, use `admin@dirstarter.com`
* If you're starting fresh, make sure to add new user in your Postgres database with `admin` role and use it to login
> **In development mode, the email is not sent anywhere.** Instead, the content is logged in the console so you can copy the login link and paste it in your browser.
Once you login, go to the "Tools" section and click "Add New Tool"
Fill in the information and click "Save" to create the entry
## Configuration
Dirstarter is an opinionated directory starter, but it's designed to be easily customized. The configuration is split into multiple files for better organization and maintainability.
The main configuration is exported from `config/index.ts` and combines all sub-configurations:
* `config/ads.ts`: **Ads Configuration** – Configure advertising spots and settings
* `config/links.ts`: **Links Configuration** – Define navigation and footer links
* `config/metadata.ts`: **Metadata Configuration** – SEO and meta information
* `config/search.ts`: **Search Configuration** – Search functionality settings
* `config/claims.ts`: **Claims Configuration** – User claim settings
* `config/submissions.ts`: **Submissions Configuration** – Form submission settings
## Next Steps
Now that you've created your first entry and customized your directory, feel free to explore the documentation at your own pace. Don't hesitate to dive into the codebase and adapt it to your specific needs.
file: ./content/docs/getting-started.mdx
meta: {
"title": "Getting Started",
"description": "Learn how to set up and run your directory website in minutes",
"icon": "Rocket"
}
This guide will walk you through setting up Dirstarter. We will go through the process of cloning the project, installing dependencies, setting up your database and running the local development server.
## Prerequisites
Before you begin, make sure you have the following installed:
* **Node.js 18.x** or later (we recommend using Node.js 20.x or later)
* **Git** (version control system)
* **A package manager** (npm, yarn, pnpm, or bun)
## Quick Installation
### Create a database
Dirstarter requires a Postgres database to work. Before creating your project, make sure to have created a new database and have the connection string ready. The Postgres connection string will look something like this:
```bash
postgresql://user:password@host:port/database
```
We've covered some options for hosting your Postgres database in the [database hosting guide](/docs/database/hosting).
### Set up your project
There are many ways to download the source code of Dirstarter. We'll cover some of the most common ones below. **Choose the one that best suits your needs.**
### Clone the repository \[!toc]
Another great option is to clone the code directly from the Dirstarter's [GitHub repository](https://github.com/dirstarter/dirstarter).
```bash title="Terminal"
git clone https://github.com/dirstarter/dirstarter.git your-project-name
cd your-project-name
```
Since the repository is read-only, you'll need your own repo to push your changes to. Once you have it, you can replace the remote origin with your own repository.
```bash title="Terminal"
git remote set-url origin https://github.com/your-username/your-repo.git
```
### Download the ZIP file \[!toc]
You can also download the ZIP file from the [GitHub repository](https://github.com/dirstarter/dirstarter) and extract it to your desired location.
You can then initialize a new Git repository using `git init` and push your changes to it.
```bash title="Terminal"
git init
git add .
git commit -m "Initial commit"
git push -u origin main
```
### Add upstream remote (optional)
If you want to be able to pull updates from the Dirstarter repository, you can add the upstream remote.
```bash title="Terminal"
git remote add upstream https://github.com/dirstarter/dirstarter.git
```
This will allow for an [easier update process](/docs/codebase/updates) from the Dirstarter repository.
### Set up environment variables
Dirstarter uses environment variables to configure the project. You can set them in the `.env` file.
First, copy the `.env.example` file to `.env` to have a starting point.
```bash title="Terminal"
cp .env.example .env
```
Then, open the `.env` file and set the variables to your desired values. You can find more information about the environment variables in the [Environment Setup](/docs/environment-setup) page.
### Install dependencies
Install the dependencies by running the following command:
```package-install title="Terminal"
npm install
```
### Initialize the database
Dirstarter uses Prisma to interact with the database. You can initialize the database by running the following command:
```package-install title="Terminal"
npm run db:generate # Generate the Prisma client
npm run db:migrate deploy # Apply migrations to the database
npm run db:seed # Seed the database with the default data
```
This will generate the Prisma client, migrate the database and seed it with the default data.
You can find more information about the database in the [Prisma Setup](/docs/database/prisma) page.
### Start the development server
Now that you have the database set up, you can start the development server by running the following command:
```package-install title="Terminal"
npm run dev
```
This will start the development server on `http://localhost:3000`. The website will be empty at this point, but we'll sort that out in the [First Steps](/docs/first-steps) guide.
## What's Next?
Now that you have Dirstarter running, here are some next steps:
file: ./content/docs/introduction.mdx
meta: {
"title": "Introduction",
"description": "Introducing Dirstarter, a complete Next.js boilerplate for building directory websites",
"icon": "Album"
}
## What is Dirstarter?
Welcome to Dirstarter, **a complete boilerplate for building directory websites**. This project is designed to accelerate your development with a robust, modular, and extensible foundation. Feel free to use it as is or extend it for your own needs.
People use Dirstarter to build directory websites for a variety of reasons:
* 🚀 **Fast & Modern** - Built with Next.js 15 App Router and TypeScript
* 🎨 **Beautiful UI** - Powered by Tailwind CSS and shadcn/ui components
* 📱 **Responsive** - Works great on all devices
* 🔍 **SEO Optimized** - Built-in SEO features
Whether you're a beginner or an experienced developer, this documentation will guide you through the setup, configuration, and deployment of your directory website.
Let's get started!
> This guide assumes you have some familiarity with Next.js, Tailwind CSS, and Prisma. If you don't have any of these, please refer to the [Official Documentation](#official-documentation) as we will not cover the basics in this guide.
## Tech Stack
[**Next.js 15**](https://nextjs.org)
The React framework for building server-side rendered (SSR), static, and hybrid web applications using React. We've experimented with many different frameworks and have settled on Next.js as the best option for directory websites due to its **performance, scalability, and ease of use**.
[**Prisma**](https://prisma.io)
An ORM (Object-Relational Mapping) tool that helps you access your database in a type-safe way. We use Prisma to define our database schema and to generate the necessary TypeScript types for our application. It also helps us to **write queries in a type-safe way** and to easily migrate our database schema.
[**Tailwind CSS**](https://tailwindcss.com)
A utility-first CSS framework packed with utility classes that can be composed to build any design, directly in your markup. We use it to create a beautiful and **consistent UI design system** you can use to build your directory website.
[**Radix UI**](https://radix-ui.com) / [**shadcn/ui**](https://ui.shadcn.com)
A collection of headless UI components that help you build **accessible and composable user interfaces**. Dirstarter is also compatible with the popular wrapper of Radix called shadcn/ui and enables you to generate pre-designed components with a single command.
[**Better Auth**](https://better-auth.com)
A modern, secure, easy-to-use and framework agnostic **authentication solution**. It provides a comprehensive set of features for user authentication, including email/password, social login, and more. It can easily be extended to support more providers and features.
## Scope of This Documentation
This documentation will guide you through configuring, running, and deploying the boilerplate, and will provide links to the official documentation of the underlying technologies where necessary. To fully grasp the boilerplate's capabilities, it's essential to understand these technologies, so be sure to explore their documentation as well.
For anything strictly related to the [Next.js directory boilerplate](/), this documentation has you covered!
### Official Documentation
For in-depth understanding of the underlying technologies, refer to their official documentation:
* Next.js: [Next.js Documentation](https://nextjs.org/docs)
* Prisma: [Prisma Documentation](https://www.prisma.io/docs)
* Tailwind CSS: [Tailwind CSS Documentation](https://tailwindcss.com/docs)
* Radix UI: [Radix UI Documentation](https://www.radix-ui.com/primitives/docs)
* shadcn/ui: [shadcn/ui Documentation](https://ui.shadcn.com/docs)
* Better Auth: [Better Auth Documentation](https://better-auth.com/docs)
Understanding these technologies is crucial for building a successful directory website.
## What's Next?
Dive into the documentation, explore the features, and start building your directory website today! 🚀
file: ./content/docs/monetization.mdx
meta: {
"title": "Monetization",
"description": "Learn about different monetization methods available in Dirstarter"
}
Dirstarter offers multiple ways to monetize your directory website. This guide covers the main monetization methods and how to implement them effectively.
## Premium Listings
Dirstarter offers three different listing plans. Feel free to experiment with pricing and extra features to find the best fit for your directory.
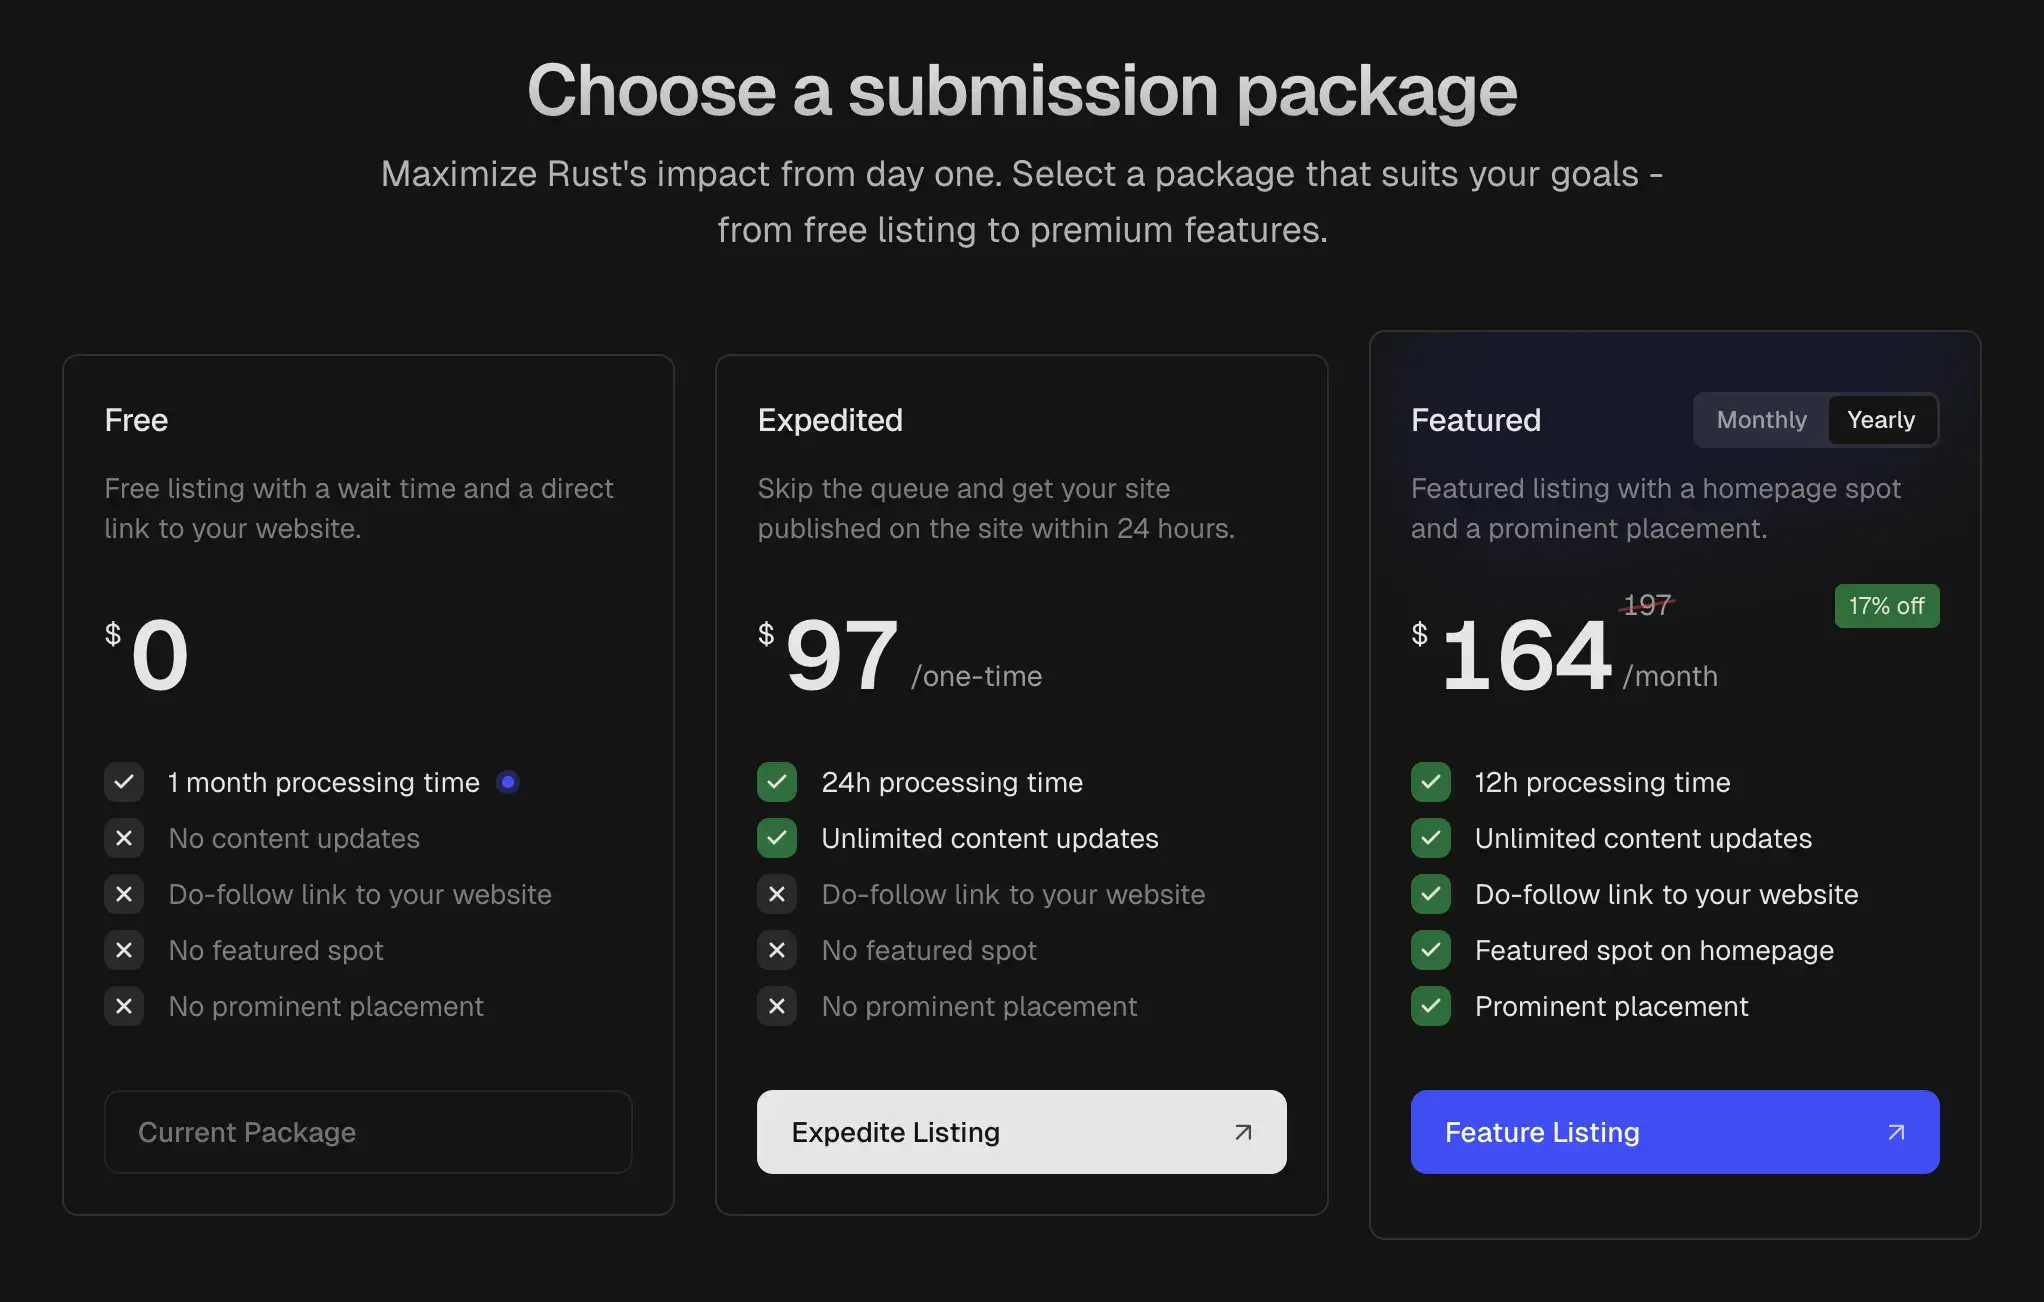
### Free
Standard listing with low priority processing time (depends on the tools in the queue).
### Expedited
One-time payment option for fast-track processing. This is a great option for businesses wanting quick visibility.
### Featured
Premium placement with homepage spotlight and monthly recurring payment. This is a great option for businesses wanting to stand out from the crowd.
Upon submitting, the tool is saved as a draft, and users are redirected to the listing plan selection page where they can choose their preferred plan and complete the payment.
If a premium listing is selected, the system notifies administrators to review and activate the submission.
For featured listings, the tool receives automatic featured status. When the subscription is canceled, the featured status is automatically removed through a Stripe webhook integration.
> For detailed Stripe integration and setup instructions, see our [Payments Guide](/docs/integrations/payments).
## Advertising System
Adversing is another great way to monetize your directory. Dirstarter includes a built-in advertising system with two main ad types.
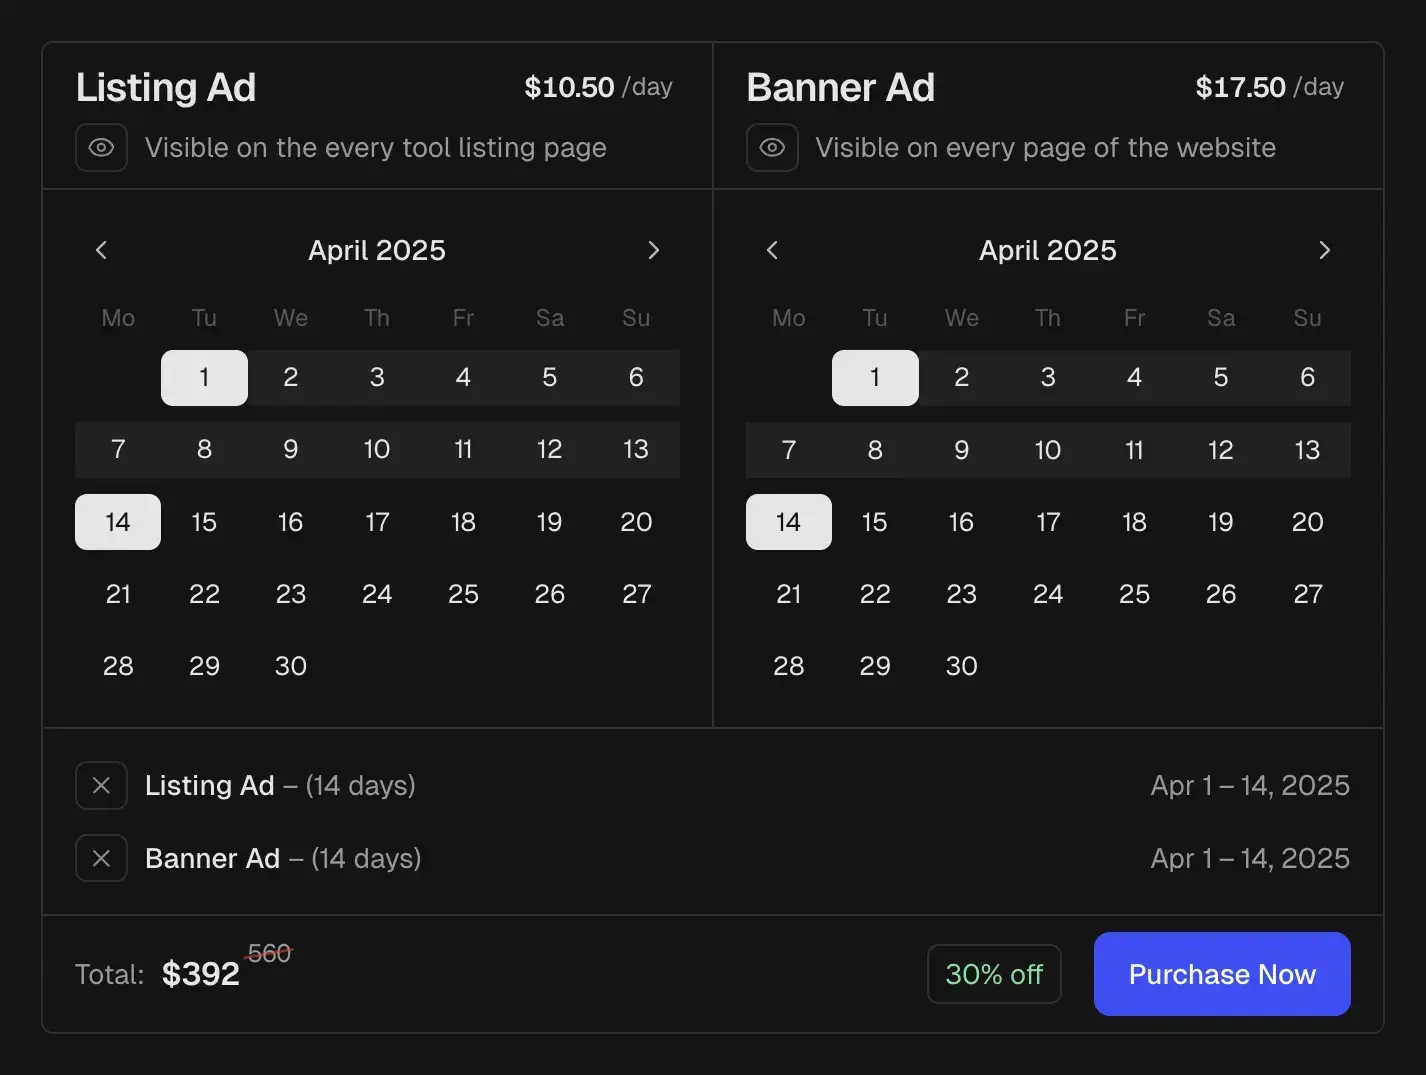
#### Listing Ad
Listing ads are displayed on the homepage and in the listings. They are a great way to get more exposure for the advertiser.
#### Banner Ad
Banner ads are displayed at the top of every page. They usually cost more than listing ads, but they are more visible and can be more effective.
### Ad Management Features
* Flexible scheduling system
* Automatic placement rotation
* Multi-date selection
* [Posthog](/docs/integrations/analytics) integration for analytics
* Bulk booking discounts (30% off for longer periods - configurable)
## Affiliate Marketing
The easiest way to monetize your directory is to use affiliate links. Dirstarter is built with affiliate marketing in mind.
There's no special setup required. Just add your affiliate links to the directory and see the sales roll in.
### Performance Tracking
A great way to track the performance of your affiliate links is to use link shortening services like [Dub](https://kulp.in/dub).
Dub is a link shortening service that allows you to track the performance of your affiliate links. It also allows to share the link analytics with anyone, so can be used to track the click through rate of the ads and other metrics.
file: ./content/docs/seo.mdx
meta: {
"title": "Search Engine Optimization",
"description": "Learn how to optimize your Dirstarter website for search engines and social media sharing."
}
Dirstarter comes with built-in SEO features to help your directory website rank better in search engines and look great when shared on social media.
## Metadata Configuration
The metadata configuration in Dirstarter is centralized and type-safe using Next.js's Metadata API. The base configuration is located in `config/metadata.ts`:
```ts title="config/metadata.ts"
import type { Metadata } from "next"
import { linksConfig } from "~/config/links"
import { siteConfig } from "~/config/site"
export const metadataConfig: Metadata = {
openGraph: {
url: "/",
siteName: siteConfig.name,
locale: "en_US",
type: "website",
images: { url: `${siteConfig.url}/opengraph.png`, width: 1200, height: 630 },
},
twitter: {
site: "@dirstarter",
creator: "@piotrkulpinski",
card: "summary_large_image",
},
alternates: {
canonical: "/",
types: { "application/rss+xml": linksConfig.feed },
},
}
```
### Static Pages
For static pages, you can define metadata directly in the page component:
```tsx title="app/(web)/about/page.tsx"
export const metadata: Metadata = {
title: "About Us",
description: "Dirstarter is a complete Next.js solution for building profitable directory websites.",
openGraph: { ...metadataConfig.openGraph, url: "/about" },
alternates: { ...metadataConfig.alternates, canonical: "/about" },
}
```
### Dynamic Pages
For dynamic pages (like tool pages, blog posts), use the `generateMetadata` function:
```tsx title="app/(web)/[slug]/page.tsx"
export const generateMetadata = async (props: PageProps): Promise => {
const tool = await getTool(props)
const url = `/${tool.slug}`
return {
...getMetadata(tool),
alternates: { ...metadataConfig.alternates, canonical: url },
openGraph: { url, type: "website" },
}
}
```
## OpenGraph Images
Dirstarter automatically generates OpenGraph images for tools using Next.js's Image Response API. The images are generated on-demand and optimized for social media sharing.
### Base Template
The base OpenGraph image template is defined in `components/web/og/og-base.tsx`:
```tsx title="components/web/og/og-base.tsx"
export const OgBase = ({ faviconUrl, name, description, children }: OgBaseProps) => {
return (
{faviconUrl && (
)}
{name}
{getExcerpt(description, 125)}
{config.site.name} — {config.site.tagline}
)
}
```
### Dynamic Generation
OpenGraph images are generated dynamically for each tool using the `opengraph-image.tsx` route:
```tsx title="app/(web)/[slug]/opengraph-image.tsx"
export default async function Image({ params }: PageProps) {
const { slug } = await params
const tool = await findTool({ where: { slug } })
return new ImageResponse(
,
{
width: 1200,
height: 630,
fonts: [
{
name: "Geist",
data: await loadGoogleFont("Geist", 400),
weight: 400,
style: "normal",
},
{
name: "GeistBold",
data: await loadGoogleFont("Geist", 600),
weight: 600,
style: "normal",
},
],
}
)
}
```
## Sitemap Generation
Dirstarter automatically generates a sitemap for all your pages using Next.js's built-in sitemap generation. The sitemap is configured in `app/sitemap.ts`:
```tsx title="app/sitemap.ts"
export default async function Sitemap(): Promise {
const [tools, categories, tags] = await Promise.all([
findToolSlugs({}),
findCategorySlugs({}),
findTagSlugs({}),
])
const pages = ["/about", "/advertise", "/submit"]
const now = new Date()
return [
// Home
createEntry("", now, { changeFrequency: "daily", priority: 1 }),
// Static pages
...pages.map(p => createEntry(p, now, { changeFrequency: "monthly" })),
// Posts
createEntry("/blog", now),
...posts.map(p => createEntry(`/blog/${p._meta.path}`, new Date(p.updatedAt ?? p.publishedAt))),
// Tools
...tools.map(t => createEntry(`/${t.slug}`, t.updatedAt)),
// Categories
createEntry("/categories", now),
...categories.map(c => createEntry(`/categories/${c.slug}`, c.updatedAt)),
// Tags
createEntry("/tags", now),
...tags.map(t => createEntry(`/tags/${t.slug}`, t.updatedAt)),
]
}
```
## Robots.txt
The robots.txt file is also automatically generated and configured to allow search engines to crawl your site while protecting sensitive routes:
```tsx title="app/robots.ts"
export default function Robots(): MetadataRoute.Robots {
const { url } = config.site
return {
rules: {
userAgent: "*",
allow: "/",
disallow: ["/admin/*", "/auth/*"],
},
host: url,
sitemap: `${url}/sitemap.xml`,
}
}
```
## Additional SEO Features
1. **Canonical URLs**: Every page has a canonical URL to prevent duplicate content issues.
2. **RSS Feed**: Built-in RSS feed support for blog posts and content updates.
3. **Structured Data**: Automatically generated JSON-LD for tools and blog posts.
4. **Mobile Optimization**: All pages are responsive and mobile-friendly by default.
5. **Performance**: Built-in image optimization and lazy loading for better Core Web Vitals.
file: ./content/docs/theming.mdx
meta: {
"title": "Theming",
"description": "Learn how to customize the appearance of your directory website using Tailwind CSS, Radix UI, and shadcn/ui components."
}
Dirstarter uses a modern theming system built on top of [Tailwind CSS](https://tailwindcss.com/docs/) v4, [Radix UI primitives](https://www.radix-ui.com), and [shadcn/ui](https://ui.shadcn.com) components. This guide will help you understand and customize the styles of your website.
The combination of Tailwind CSS, Radix UI and shadcn/ui components allows ready-to-use, complex UI components that can be fully customized to match your brands design.
## Color System
The color system is defined using CSS variables in the `@theme` configuration. The base theme includes:
```css title="app/styles.css"
:root {
--color-background: hsl(0 0% 100%);
--color-foreground: hsl(0 0% 12%);
--color-border: hsl(0 0% 88%);
--color-input: hsl(0 0% 88%);
--color-ring: hsl(0 0% 83%);
--color-card: hsl(0 0% 98%);
--color-card-foreground: hsl(0 0% 12%);
--color-popover: hsl(0 0% 100%);
--color-popover-foreground: hsl(0 0% 3.9%);
--color-primary: hsl(234 98% 61%);
--color-primary-foreground: hsl(0 0% 98%);
--color-secondary: hsl(0 0% 96%);
--color-secondary-foreground: hsl(0 0% 30%);
--color-muted: hsl(0 0% 96%);
--color-muted-foreground: hsl(0 0% 45.1%);
--color-accent: hsl(0 0% 96%);
--color-accent-foreground: hsl(0 0% 9%);
--color-destructive: hsl(0 84.2% 60.2%);
--color-destructive-foreground: hsl(0 0% 98%);
}
```
### Dark Mode
Dark mode is automatically handled using the `prefers-color-scheme` media query. The dark theme colors are defined as:
```css title="app/styles.css"
@media (prefers-color-scheme: dark) {
:root {
--color-background: hsl(0 0% 8%);
--color-foreground: hsl(0 0% 90%);
--color-border: hsl(0 0% 18%);
--color-input: hsl(0 0% 18%);
--color-ring: hsl(0 0% 23%);
--color-card: hsl(0 0% 11%);
--color-card-foreground: hsl(0 0% 90%);
--color-popover: hsl(0 0% 8%);
--color-popover-foreground: hsl(0 0% 90%);
--color-primary: hsl(234 98% 61%);
--color-primary-foreground: hsl(0 0% 98%);
--color-secondary: hsl(0 0% 13%);
--color-secondary-foreground: hsl(0 0% 70%);
--color-muted: hsl(0 0% 13%);
--color-muted-foreground: hsl(0 0% 60%);
--color-accent: hsl(0 0% 13%);
--color-accent-foreground: hsl(0 0% 90%);
--color-destructive: hsl(0 62.8% 30.6%);
--color-destructive-foreground: hsl(0 0% 98%);
}
}
```
## Typography
The typography system uses Geist font as the primary font family by default:
```css
@theme {
--font-system: ui-sans-serif, system-ui, sans-serif, "Apple Color Emoji", "Segoe UI Emoji",
"Segoe UI Symbol", "Noto Color Emoji";
--font-sans: var(--font-geist), var(--font-system);
--font-display: var(--font-geist), var(--font-system);
}
```
## Component Variants
Components use the [cva.style](https://beta.cva.style/) utility for variant management. This is a modern and powerful utility for defining and managing class variants. Here's an example of how variants are defined:
```tsx title="components/ui/button.tsx"
const buttonVariants = cva({
base: "relative border text-sm/tight rounded-md",
variants: {
variant: {
primary: "text-background bg-foreground hover:opacity-90",
secondary: "bg-background text-secondary-foreground hover:bg-card",
},
size: {
sm: "px-2 py-1",
md: "px-3 py-2",
lg: "px-4 py-2.5",
},
},
defaultVariants: {
variant: "primary",
size: "lg",
},
})
```
## Customizing Components
### Using Radix UI Primitives
Components are built on top of [Radix UI](https://www.radix-ui.com) primitives for accessibility and functionality. For example:
```tsx
const Dialog = DialogPrimitive.Root
const DialogTrigger = DialogPrimitive.Trigger
const DialogPortal = DialogPrimitive.Portal
const DialogClose = DialogPrimitive.Close
```
### Styling with Tailwind
Components use [Tailwind CSS](https://tailwindcss.com/docs) for styling. You can customize the appearance by:
1. Modifying the base styles in the component's `cva` configuration
2. Extending the component with additional classes using the `className` prop
3. Overriding the theme variables in your CSS
### Example: Custom Button
```tsx
const CustomButton = ({ className, ...props }) => (
)
```
## Best Practices
1. **Use CSS Variables**: Always use theme variables for colors and other design tokens
2. **Maintain Consistency**: Follow the established patterns for component variants
3. **Accessibility**: Leverage Radix UI primitives for accessible components
4. **Responsive Design**: Use the responsive utilities provided by Tailwind
5. **Dark Mode**: Test your customizations in both light and dark modes
## Extending the Theme
To extend the theme:
1. Add new CSS variables in the `@theme` configuration
2. Create new component variants using `cva`
3. Add new utility classes in the Tailwind configuration
4. Create new components following the established patterns
file: ./content/docs/codebase/ide.mdx
meta: {
"title": "VSCode / Cursor Setup",
"description": "Learn how to set up VSCode / Cursor / Windsurf for optimal development experience"
}
Dirstarter comes with pre-configured settings for VSCode and Cursor to provide an optimal development experience. This guide will help you set up your editor for maximum productivity.
## Recommended Extensions
The project includes a `.vscode/extensions.json` file that will prompt you to install these extensions when you open the project in VSCode or Cursor. Dirstarter works best with the following extensions:
### Biome
Biome is a powerful tool that helps you to format and lint your code. It combines the functionality of Prettier and ESLint in a much more performant way.
[Download](https://marketplace.visualstudio.com/items?itemName=biomejs.biome).
### Prisma
Prisma extension for VSCode adds syntax highlighting, formatting, auto-completion, jump-to-definition and linting for .prisma files.
[Download](https://marketplace.visualstudio.com/items?itemName=Prisma.prisma).
### Tailwind CSS IntelliSense
Tailwind CSS IntelliSense is a powerful tool that helps you to autocomplete Tailwind classes.
[Download](https://marketplace.visualstudio.com/items?itemName=bradlc.vscode-tailwindcss).
## Editor Configuration
The repository includes pre-configured settings in `.vscode/settings.json` that set up:
* Biome settings for formatting and linting
* TypeScript settings
* File associations
## Recommended Workflow
For the best development experience:
1. Use the **integrated terminal** to run development commands
2. Leverage the **Problems** panel to quickly find and fix issues
3. Use the **Source Control** panel for Git operations
4. Take advantage of the built-in IntelliSense for TypeScript and React
## Custom Cursor Rules (Pro Version)
Dirstarter Pro includes exclusive **Cursor Rules**—custom AI rules designed specifically for the Cursor IDE. These rules help you speed up the development of custom features by providing intelligent code suggestions, automations, and best practices tailored to the Dirstarter codebase.
**How to Access:**
* Cursor Rules are available only to Pro customers. After purchasing the Pro plan, you will receive access instructions via email.
* The rules are easy to import into your Cursor IDE and come with setup documentation.
**What You Get:**
* Custom AI-powered code completions and refactorings
* Automated best-practice enforcement for Dirstarter projects
* Enhanced productivity for building and customizing directory features
If you have the Pro version and need help setting up Cursor Rules, please contact support for assistance.
## Next Steps
Now that your editor is configured, learn about [Formatting & Linting](/docs/codebase/linting) to maintain code quality.
file: ./content/docs/codebase/linting.mdx
meta: {
"title": "Formatting & Linting",
"description": "Guide to using Biome for code quality"
}
Dirstarter uses [Biome](https://biomejs.dev/) for code formatting and linting to ensure consistent code quality across the project.
Biome is configured in the project root with `biome.json`. This configuration enforces consistent code style and catches common errors.
## Key Features
* **Zero-config**: Works out of the box with sensible defaults
* **Fast**: Written in Rust for maximum performance
* **All-in-one**: Combines linting, formatting, and more in a single tool
## Running Linting & Formatting
### Check Code Quality
To check your code without making changes:
```package-install
npm run lint
```
This command will report any linting errors or warnings in your codebase.
### Format Code
To automatically format your code:
```package-install
npm run format
```
This will format all supported files according to the project's style rules.
## Editor Integration
Biome works best when integrated with your editor:
* [**VSCode/Cursor**](/docs/codebase/ide): Install the Biome extension for real-time linting and formatting
* **Other Editors**: Check the [Biome documentation](https://biomejs.dev/guides/integrate-in-editor) for integration options
## Customizing Rules
The project's Biome configuration is defined in `biome.json`. If you need to modify the rules follow the [Biome documentation](https://biomejs.dev/reference/configuration/).
```json title="biome.json"
{
"$schema": "https://biomejs.dev/schemas/1.9.4/schema.json",
"organizeImports": {
"enabled": true
},
"linter": {
"enabled": true,
"rules": {
"recommended": true
}
},
"formatter": {
"enabled": true,
"indentStyle": "space"
}
}
```
## TypeScript Integration
Biome works alongside TypeScript to provide comprehensive code quality checks:
* TypeScript handles type checking
* Biome handles style and common errors
* Together they provide a robust development experience
## Next Steps
Now that you understand how code quality is maintained, learn about [updating the codebase](/docs/codebase/updates) to stay current with the latest improvements.
file: ./content/docs/codebase/structure.mdx
meta: {
"title": "Project Structure",
"description": "Overview of the Dirstarter file and folder organization"
}
Dirstarter follows a modular architecture based on Next.js App Router. This page explains the key directories and files in the project.
## Root Directory Structure
## Key Directories
### `/components` Directory
Components are organized by their purpose:
### `/server` Directory
Server-side code is organized by feature:
Each folder contains a well-defined set of files for a specific feature. You can store your **server actions, queries, schemas, and other server-side code** in these folders.
## Key Files
* **`prisma/schema.prisma`**: Defines your database schema
* **`content-collections.ts`**: Configures MDX content collections
* **`middleware.ts`**: Contains route protection logic
* **`next.config.js`**: Next.js configuration
* **`.env.example`**: Template for environment variables
## Naming Conventions
Dirstarter follows these naming conventions:
* **React Components**: PascalCase (e.g., `ToolCard.tsx`)
* **Utility Functions**: camelCase (e.g., `formatDate.ts`)
* **Server Actions**: camelCase (e.g., `createTool.ts`)
* **Database Models**: PascalCase in schema, camelCase in code
## Next Steps
Now that you understand the project structure, explore these related topics:
* [VSCode / Cursor Setup](/docs/codebase/ide)
* [Formatting & Linting](/docs/codebase/linting)
* [Update the Codebase](/docs/codebase/updates)
file: ./content/docs/codebase/updates.mdx
meta: {
"title": "Updating the Codebase",
"description": "How to keep your Dirstarter project up to date with the latest changes"
}
Dirstarter is actively maintained and regularly updated with new features, bug fixes, and security patches. This guide explains how to update your project to the latest version.
While updating your codebase to the latest version is possible, it's important to note that the more customizations you make to your application, the more complex the update process becomes. This is because updates involve rebasing your custom code on top of the latest Dirstarter code using Git, which may require resolving merge conflicts and careful handling to preserve your customizations.
Before updating your codebase, ensure your Git repository is clean with no uncommitted changes.
## Update Process
### Method 1: Using Git (Recommended)
If you started your project using the Git repository, you can pull updates directly. There are two approaches:
#### Option A: Merge Approach (Safer) \[!toc]
Choose this option if you want a safer update process with clear merge points.
```bash title="Terminal"
# Add the upstream remote if you haven't already
git remote add upstream https://github.com/dirstarter/dirstarter.git
# Fetch the latest changes
git fetch upstream
# Create a new branch for the update
git checkout -b update-dirstarter
# Merge the changes (resolve conflicts if necessary)
git merge upstream/main
```
#### Option B: Rebase Approach (Cleaner History) \[!toc]
Choose this option if you prefer a linear history. This approach is more advanced and may require more Git experience to resolve conflicts.
```bash title="Terminal"
# Add the upstream remote if you haven't already
git remote add upstream https://github.com/dirstarter/dirstarter.git
# Fetch latest changes and rebase
git pull upstream main --rebase
```
If you have any merge conflicts, you will have to resolve them manually. If you are not sure how to do this, please refer to the [Git documentation](https://git-scm.com/docs/git-merge).
### Method 2: Manual Update
If you prefer to update manually or didn't use Git:
1. [Download the latest version](https://github.com/dirstarter/dirstarter) of Dirstarter
2. Compare your customized files with the new version
3. Apply changes selectively, focusing on:
* `package.json` for dependency updates
* Configuration files like `next.config.js`
* Core functionality in `lib` and `server` directories
## Dependency Updates
To update only the dependencies:
```bash title="Terminal"
# Update all dependencies to their latest versions
npm update
# Update a specific dependency
npm update next
# Update to specific versions
npm install next@15.2.0
```
For major dependency updates, check compatibility first:
```bash title="Terminal"
# Check for major updates
npx npm-check-updates
# Apply major updates (use with caution)
npx npm-check-updates -u
npm install
```
## Database Schema Updates
When updates include database schema changes:
1. Check the migration files in the `prisma/migrations` directory
2. Apply migrations with:
```package-install title="Terminal"
npm run db:migrate
```
## Testing After Updates
After updating, thoroughly test your application:
1. Run the development server: `npm run dev`
2. Check for console errors
3. Test critical user flows
4. Run linting and formatting: `npm run lint` and `npm run format`
5. Check build: `npm run build`
## Keeping Up with Changes
To stay informed about updates:
1. Watch the [GitHub repository](https://github.com/dirstarter/dirstarter)
2. Check the [changelog](/changelog) regularly
3. Join the community [Discord server](https://discord.gg/dirstarter)
file: ./content/docs/database/hosting.mdx
meta: {
"title": "Postgres Hosting",
"description": "Options for hosting your Postgres database"
}
Dirstarter requires a Postgres database to work. This guide covers various hosting options for your database, from managed services to self-hosted solutions.
## Hosted Postgres services
Hosted Postgres services are a great way to get started with Postgres. They are easy to set up and use, and most of them offer a generous free tier.
### Neon
[Neon](https://neon.tech) is a serverless Postgres service with a generous free tier.
* Serverless architecture
* Branching for development/staging
* Automatic scaling
* Free tier with 500MB storage
### Supabase
[Supabase](https://supabase.com) provides Postgres databases with additional features like authentication and storage.
* Full Postgres support
* Additional services (auth, storage, etc.)
* Free tier with 500MB storage and 5GB data transfer
* Simple dashboard
### Prisma Postgres
[Prisma Postgres](https://www.prisma.io/postgres) is a managed Postgres service with a generous free tier.
* Serverless architecture
* Automatic scaling
* Free tier with 1 GB storage
### Railway
[Railway](https://railway.app) offers simple Postgres provisioning with automatic deployments.
* Easy setup
* Integrated with deployments
* Reasonable pricing
* Good developer experience
## Self-Hosted Options
### Docker
You can run Postgres in a Docker container:
```bash title="Terminal"
docker run --name dirstarter-postgres -e POSTGRES_PASSWORD=postgres -p 5432:5432 -d postgres
```
Then use this connection string:
```
DATABASE_URL="postgres://postgres:postgres@localhost:5432/postgres"
```
### Local Installation
Install Postgres directly on your machine:
1. Download from [postgres.org](https://www.postgres.org/download/) or using [Homebrew](https://brew.sh)
2. Install and set up a password
3. Create a database
Then use this connection string:
```
DATABASE_URL="postgres://postgres:yourpassword@localhost:5432/dirstarter"
```
file: ./content/docs/database/prisma.mdx
meta: {
"title": "Prisma Setup",
"description": "Learn about Prisma configuration and usage in Dirstarter"
}
[Prisma](https://prisma.io/) is a modern database toolkit that serves as the ORM for Dirstarter. This guide explains how Prisma is configured and used in the project.
Prisma provides several key components:
* **Prisma Client**: Auto-generated type-safe query builder
* **Prisma Schema**: Defines your database models and relationships
* **Prisma Migrate**: Handles database migrations
* **Prisma Studio**: GUI to view and edit data
> Dirstarter comes with Prisma pre-configured with PostgreSQL. The main Prisma-related files are:
>
> * `prisma/schema.prisma`: Defines your database schema
> * `prisma/seed.ts`: Contains seed data for development
> * `services/db.ts`: Configures and exports the Prisma client
## Setup
1. Set up your [PostgreSQL database](/docs/database/hosting)
2. Add your database URL to `.env`:
```dotenv title=".env"
DATABASE_URL="postgresql://user:password@host:5432/dirstarter"
```
## Database Management Commands
The following commands are available in `package.json`:
```package-install
npm run db:generate # Generate Prisma Client
npm run db:migrate # Create and apply migrations
npm run db:studio # Open Prisma Studio (GUI)
npm run db:push # Push schema changes directly to database
npm run db:reset # Reset database and apply migrations
npm run db:seed # Seed database with initial data
```
## Updating Database Schema
To update your database schema, edit the `prisma/schema.prisma` file. Here's how to manage schema changes:
### Edit Schema
Add or modify models in `prisma/schema.prisma`. For example, to add a new model:
```prisma
model Post {
id String @id @default(cuid())
title String
content String
author User @relation(fields: [authorId], references: [id])
authorId String
createdAt DateTime @default(now())
updatedAt DateTime @updatedAt
}
```
### Create Migration (Optional)
To track schema changes in version control:
```package-install title="Terminal"
npm run db:migrate dev
```
This creates a new migration file in `prisma/migrations`.
### Push Changes
Apply schema changes to your database:
```package-install title="Terminal"
npm run db:push
```
### Generate Client
After pushing changes, regenerate the Prisma client:
```package-install title="Terminal"
npm run db:generate
```
Note: This runs automatically when starting the development server.
## Seeding the Database
The project includes a comprehensive seed file (`prisma/seed.ts`) that creates demo data:
1. Default users (admin and regular user)
2. Common categories (Frontend, Backend, etc.)
3. Popular tags (React, Vue, TypeScript, etc.)
4. Sample tools with relationships
> Feel free to modify the seed data as needed. You can also clear the database and start fresh with `npm run db:reset` once you start to feel comfortable with the data in your database.
### Customizing Seed Data
To modify the seed data:
1. Edit `prisma/seed.ts`
2. Run `npm run db:reset` to apply changes
### Seeding from CSV
To seed from a CSV file, modify `prisma/seed.ts` and adjust the code to your needs.
```ts title="prisma/seed.ts"
import { parse } from 'csv-parse/sync'
import { readFileSync } from 'fs'
async function main() {
const csvContent = readFileSync('./data/tools.csv', 'utf-8')
const records = parse(csvContent, {
columns: true,
skip_empty_lines: true
})
for (const record of records) {
await prisma.tool.create({
data: {
name: record.name,
slug: record.slug,
websiteUrl: record.websiteUrl,
// ... map other fields
categories: {
connect: record.categories.split(',').map(slug => ({ slug }))
},
tags: {
connect: record.tags.split(',').map(slug => ({ slug }))
}
}
})
}
}
```
## Prisma Client Usage
The Prisma client is initialized as a singleton in `services/db.ts`:
```ts title="services/db.ts"
import { PrismaClient } from "@prisma/client"
const prismaClientSingleton = () => {
return new PrismaClient()
}
declare const globalThis: {
dbGlobal: ReturnType
} & typeof global
const db = globalThis.dbGlobal ?? prismaClientSingleton()
export { db }
if (process.env.NODE_ENV !== "production") globalThis.dbGlobal = db
```
Use it in your code:
```typescript
import { db } from "~/services/db"
// Example query
const tools = await db.tool.findMany({
where: { status: "Published" },
include: { categories: true, tags: true }
})
```
To learn more about the Prisma client, check out the [official documentation](https://www.prisma.io/docs/orm/prisma-client).
## Prisma Studio
Prisma Studio is a GUI to view and edit data in your database. You can open it by running the following command in the terminal:
```package-install title="Terminal"
npm run db:studio
```
This will start the Prisma Studio in your browser. You can use it to view and edit data in your database.
## VS Code Integration
The project includes Prisma [VS Code extension](/docs/codebase/ide) recommendations for:
* Syntax highlighting
* Auto-completion
* Schema validation
* Quick fixes
Install the recommended extensions for the best development experience.
file: ./content/docs/integrations/analytics.mdx
meta: {
"title": "Analytics",
"description": "Learn how to set up and use PostHog and Plausible analytics"
}
Dirstarter uses two analytics tools for different purposes:
1. [**PostHog**](https://posthog.com) - For user behavior tracking and event analytics
2. [**Plausible**](https://plausible.io) - For privacy-friendly website analytics
While they are recommended, you can use any other analytics tool you want.
## PostHog
PostHog is used for detailed user behavior tracking and event analytics. It's particularly useful for:
* Tracking user interactions (clicks, form submissions)
* Monitoring conversion rates
* Analyzing user flows
* Custom event tracking
### Setup
1. Create a PostHog account at [posthog.com](https://posthog.com)
2. Create a new project
3. Get your API key from Project Settings > Project API Key
4. Add the following environment variables:
```dotenv title=".env"
NEXT_PUBLIC_POSTHOG_API_KEY=your_api_key
NEXT_PUBLIC_POSTHOG_HOST=https://app.posthog.com
```
### Configuration
PostHog is configured with the following settings:
```ts title="app/(web)/providers.tsx"
posthog.init(env.NEXT_PUBLIC_POSTHOG_API_KEY, {
ui_host: env.NEXT_PUBLIC_POSTHOG_HOST,
api_host: "/_proxy/posthog/ingest",
person_profiles: "identified_only",
capture_pageview: false,
capture_pageleave: true,
})
```
### Usage
The boilerplate automatically tracks:
* Page views (via `PosthogPageview` component)
* External link clicks
* Newsletter subscriptions
* Tool submissions
* Stripe checkout events
To track custom events:
```ts
import { posthog } from "posthog-js"
// Track an event
posthog.capture("event_name", {
property1: "value1",
property2: "value2"
})
```
## Plausible
Plausible is used for privacy-friendly website analytics. It's particularly useful for:
* Basic website traffic metrics
* Page view statistics
* Visitor demographics
* No cookie consent required
### Setup
1. Create a Plausible account at [plausible.io](https://plausible.io)
2. Add your website
3. Get your domain and API key
4. Add the following environment variables:
```dotenv title=".env"
NEXT_PUBLIC_PLAUSIBLE_DOMAIN=your-domain.com
NEXT_PUBLIC_PLAUSIBLE_URL=https://plausible.io
PLAUSIBLE_API_KEY=your_api_key
```
### Usage
The boilerplate automatically includes the Plausible script in the root layout:
```tsx title="app/layout.tsx"
```
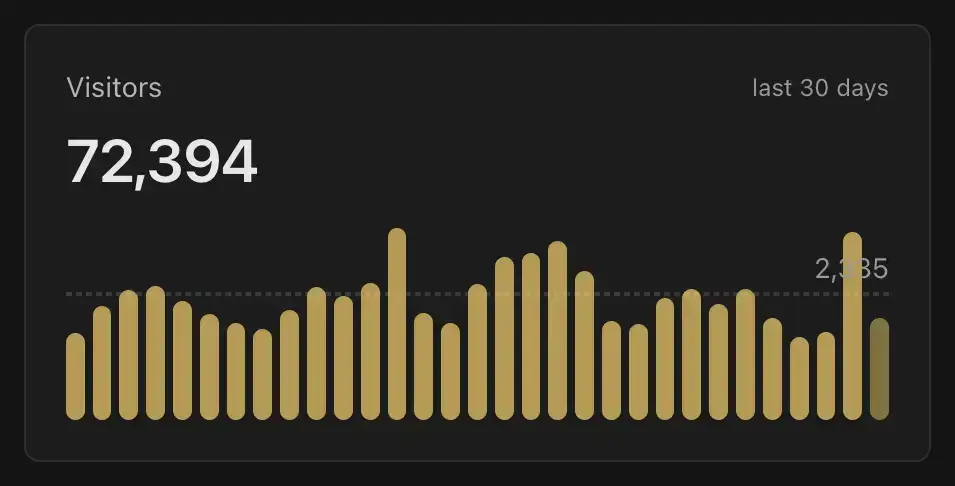
### Admin Dashboard Integration
The admin dashboard includes an analytics card that shows:
* Total visitors (30-day period)
* Average daily visitors
* Visitor trends
## Why Two Separate Tools?
The boilerplate uses both tools for different purposes:
* **PostHog**: Detailed user behavior tracking, conversion monitoring, and custom event tracking
* **Plausible**: Privacy-friendly basic analytics that don't require cookie consent
This combination provides:
1. Comprehensive analytics for business insights (PostHog)
2. Privacy-friendly basic metrics (Plausible)
3. GDPR compliance through Plausible's cookie-free approach
4. Detailed user behavior analysis through PostHog
file: ./content/docs/integrations/email.mdx
meta: {
"title": "Email",
"description": "Learn how to set up and use Resend for email delivery and React Email for beautiful email templates"
}
Dirstarter uses [Resend](https://resend.com) for email delivery and [React Email](https://react.email) for creating beautiful, responsive email templates. This combination provides a modern, developer-friendly way to handle email communications.
Resend is a modern email API that offers:
* High deliverability rates
* Real-time analytics
* Simple API
* TypeScript support
* Marketing email service
* Webhook support
* React Email integration
## Setup
1. Create a Resend account at [resend.com](https://resend.com)
2. Get your API key from the dashboard
3. Add the following environment variables:
```dotenv title=".env"
RESEND_API_KEY=your_api_key
RESEND_SENDER_EMAIL=your-verified-email@domain.com
RESEND_AUDIENCE_ID=your-audience-id
```
> For more information on the available options and API endpoints, see the [Resend documentation](https://resend.com/docs).
## Transactional Emails
### Usage
The boilerplate provides a simple email sending utility that supports both single and batch sending:
```ts
import { sendEmail } from "~/lib/email"
// Send an email to user@example.com
await sendEmail({
to: "user@example.com",
subject: "Welcome to our platform",
react: WelcomeEmail({ name: "John" })
})
```
> This utility also creates a text-only version of the email for clients that don't support HTML.
### React Email
React Email allows you to create beautiful, responsive email templates using React components. The boilerplate includes several pre-built templates for different use cases:
#### Pre-built Templates
1. **Authentication**
* `login-link.tsx` - Passwordless authentication emails
2. **Tool Management**
* `tool-published.tsx` - Notification when a tool is published
* `tool-scheduled.tsx` - Confirmation when a tool is scheduled
* `tool-claim-otp.tsx` - OTP verification for tool claims
* `tool-expedite-reminder.tsx` - Reminder for expedited submissions
3. **Submissions**
* `submission.tsx` - Confirmation for new tool submissions
* `submission-expedited.tsx` - Admin notification for expedited submissions
#### Creating Custom Templates
1. Create a new template in the `emails` directory:
```ts title="emails/custom.tsx"
import { Text } from "@react-email/components"
import { EmailWrapper, type EmailWrapperProps } from "~/emails/components/wrapper"
import { Button } from "~/emails/components/button"
type EmailProps = EmailWrapperProps & {
name: string
actionUrl: string
}
const CustomEmail = ({ name, actionUrl, ...props }: EmailProps) => {
return (
Hey {name}!
Thanks for joining our platform. Click the button below to get started.
)
}
export default CustomEmail
```
2. Preview your template locally:
```package-install
npm run email
```
3. Use the template in your code:
```ts
import CustomEmail from "~/emails/custom"
await sendEmails({
to: "user@example.com",
subject: "Welcome to our platform",
react: CustomEmail({ name: "John", actionUrl: "https://example.com/start" })
})
```
#### Email Components
The boilerplate includes reusable email components in `emails/components/` that use Tailwind CSS for styling:
* `EmailWrapper` - Base wrapper component that provides consistent layout and styling
* `Button` - Styled button component with Tailwind classes
* `Container` - Responsive container with Tailwind classes
* `Footer` - Standard footer with social links and Tailwind styling
* `Header` - Email header with logo and Tailwind classes
* `Section` - Content section with consistent spacing using Tailwind
## Marketing Emails
Dirstarter offers a marketing email service that allows you to send newsletters to your audience. It provides:
* Newsletter subscription handling
* Email validation and spam prevention
* Subscriber analytics
* Admin dashboard integration
### Admin Dashboard Integration
The admin dashboard includes a subscribers card that shows:
* Total subscribers
* Average daily subscriptions
* Subscription trends
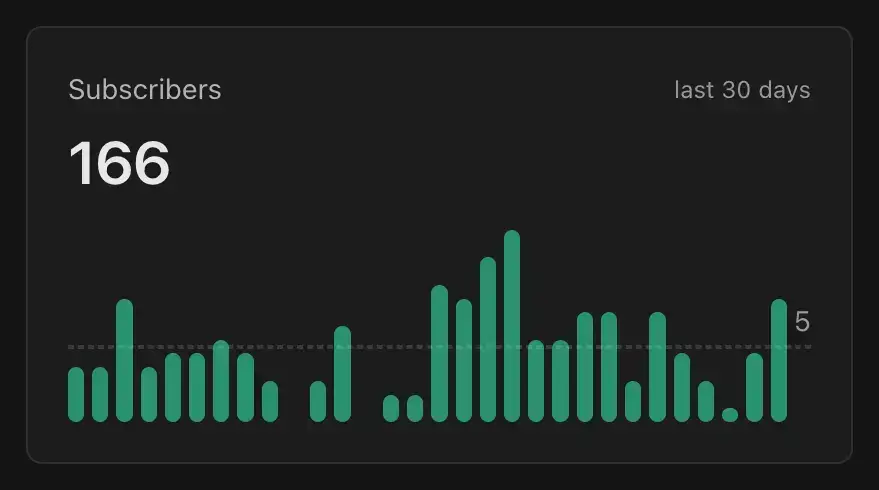
## Alternatives
While Resend is our recommended choice, here are some alternatives:
1. [**SendGrid**](https://sendgrid.com)
* Pros: Established, feature-rich
* Cons: More complex setup, higher pricing
2. [**Mailgun**](https://mailgun.com)
* Pros: Good deliverability, developer-friendly
* Cons: Less modern API, more complex pricing
3. [**Amazon SES**](https://aws.amazon.com/ses/)
* Pros: Very cost-effective, high scalability
* Cons: Basic features, requires more setup
4. [**PostMark**](https://postmarkapp.com)
* Pros: Excellent deliverability, simple API
* Cons: Higher pricing, fewer features
5. [**Plunk**](https://plunk.com)
* Pros: Affordable, privacy-focused, open source
* Cons: Developer experience is not as good as Resend
file: ./content/docs/integrations/index.mdx
meta: {
"title": "Overview",
"description": "Overview of all available integrations in Dirstarter"
}
Dirstarter comes with several pre-configured third-party integrations that extend its functionality. This section covers all the integrations available in the boilerplate and how to set them up.
> We chose these integrations because they are commonly used in the industry and are a good fit for the boilerplate. All of them are **free to use** or have a **generous free tier**.
## Available Integrations
Dirstarter includes the following third-party integrations:
Choose the integration you want to set up from the sidebar to get started.
file: ./content/docs/integrations/media.mdx
meta: {
"title": "Media",
"description": "Learn how to automate screenshot and favicon generation for your listings"
}
Dirstarter integrates with [ScreenshotOne](https://kulp.in/screenshotone) to automatically generate and manage screenshots for your directory listings. We also automatically fetch favicons for your listings using Google's favicon API.
This integration helps automate media generation and ensures consistent visual representation across your directory.
## Screenshots
ScreenshotOne is a powerful API service that supercharges your directory website with automated media capabilities:
* Generate **high-quality screenshots** of any website
* **Real-time preview** generation for new listings
* Consistent **image quality** and dimensions
* **Reduces manual work** for directory owners
* Directly **uploads to S3 [storage](/docs/integrations/storage)**
### Setup
Create a [ScreenshotOne account](https://kulp.in/screenshotone), navigate to the **API Keys** page and add your credentials to your `.env` file:
```bash title=".env"
SCREENSHOTONE_ACCESS_KEY=your_access_key
```
### Media Service Implementation
The screenshot generation is handled through a dedicated media service. Here's the implementation:
```tsx title="lib/media.ts"
export const uploadScreenshot = async (url: string, s3Key: string): Promise => {
const timestamp = Date.now()
const query = {
// screenshotone options
}
const { data, error } = await tryCatch(
wretch("https://api.screenshotone.com/take")
.query(query)
.get()
.json<{ store: { location: string } }>(),
)
if (error) {
console.error("Error fetching screenshot:", error)
throw error
}
return `${data.store.location}?v=${timestamp}`
}
```
For information on the available options, refer to the [ScreenshotOne Docs](https://screenshotone.com/docs/).
### Usage in Components
Here's how to use the screenshot generation in your components:
```tsx title="components/screenshot-generator.tsx"
'use client'
import { useState } from 'react'
import { Button } from '~/components/ui/button'
import { uploadScreenshot } from '~/lib/media'
type Props = {
url: string
toolId: string
onSuccess?: (url: string) => void
}
export function ScreenshotGenerator({ url, toolId, onSuccess }: Props) {
const [isGenerating, setIsGenerating] = useState(false)
const handleGenerate = async () => {
setIsGenerating(true)
try {
const s3Key = `tools/${toolId}/screenshot.webp`
const screenshotUrl = await uploadScreenshot(url, s3Key)
onSuccess?.(screenshotUrl)
} catch (error) {
console.error('Failed to generate screenshot:', error)
} finally {
setIsGenerating(false)
}
}
return (
)
}
```
## Favicons
In addition to screenshots, Dirstarter automatically generates favicons for your directory listings using Google's favicon service:
```tsx title="lib/media.ts"
export const uploadFavicon = async (url: string, s3Key: string): Promise => {
const timestamp = Date.now()
const cleanedUrl = encodeURIComponent(stripURLSubpath(url) ?? "")
const faviconUrl = `https://www.google.com/s2/favicons?sz=128&domain_url=${cleanedUrl}`
// Fetch favicon from Google's service
const faviconResponse = await tryCatch(
wretch(faviconUrl)
.get()
.badRequest(console.error)
.arrayBuffer()
.then(buffer => Buffer.from(buffer)),
)
if (faviconResponse.error) {
console.error("Error fetching favicon:", faviconResponse.error)
return null
}
// Upload to S3
const { data, error } = await tryCatch(uploadToS3Storage(faviconResponse.data, `${s3Key}.png`))
if (error) {
console.error("Error uploading favicon:", error)
return null
}
return `${data}?v=${timestamp}`
}
```
Key features of the favicon generation:
* Uses Google's reliable favicon service
* Fetches high-quality 128x128px icons
* Automatically cleans and encodes URLs
* Handles errors gracefully
* [Uploads to S3](/docs/integrations/storage) with cache busting
file: ./content/docs/integrations/payments.mdx
meta: {
"title": "Payments",
"description": "Learn how to set up and use Stripe for handling payments and subscriptions"
}
Dirstarter uses [Stripe](https://stripe.com) for payment processing and subscription management. This integration handles expedited listings, featured spots, and recurring subscriptions.
## Stripe Setup
1. Create a Stripe account at [stripe.com](https://stripe.com)
2. [Get your API keys](https://support.stripe.com/questions/what-are-stripe-api-keys-and-how-to-find-them) from the dashboard
3. Add the following environment variables:
```dotenv title=".env"
STRIPE_SECRET_KEY=sk_test_...
```
We only use the secret key. No need to create a publishable key.
### Product Configuration
We recommend creating the following products in your Stripe dashboard:
**Free**
```ts
{
name: "Free Listing",
description: "Free listing with wait time",
amount: 0,
currency: "usd",
type: "one_time",
features: [
"• {queue} processing time", // will be replaced with the actual wait time
"✗ No content updates",
"✗ Do-follow link to your website",
"✗ No featured spot",
"✗ No prominent placement",
]
}
```
**Expedited** (One-time payment)
```ts
{
name: "Expedited Listing",
description: "Skip the queue and get published within 24 hours",
amount: 97, // set your own price
currency: "usd",
type: "one_time",
features: [
"✓ 24h processing time",
"✓ Unlimited content updates",
"✗ Do-follow link to your website",
"✗ No featured spot",
"✗ No prominent placement",
]
}
```
**Featured** (Subscription)
```ts
{
name: "Featured Listing",
description: "Featured listing with homepage spot",
amount: 197, // set your own price
currency: "usd",
type: "recurring",
interval: "month",
features: [
"✓ 12h processing time",
"✓ Unlimited content updates",
"✓ Do-follow link to your website",
"✓ Featured spot on homepage",
"✓ Prominent placement"
]
}
```
The icons at the beginning of each feature are optional, but recommended for better readability. They are rendered using proper colors and icons.
## Populating Stripe Products
You can quickly set up the recommended Stripe products and prices using the provided script in your project at `scripts/setup-stripe-products.ts`. This script will create all necessary products and prices in your Stripe account as defined for Dirstarter.
To run the script, use:
```bash
bun run scripts/setup-stripe-products.ts
```
If you are not using Bun, you can install the [ts-node](https://www.npmjs.com/package/ts-node) package to run the script.
Make sure your environment variables are set up with your Stripe secret key before running the script. This is useful for initial setup or replicating your Stripe environment.
## Webhook Setup
Stripe webhooks are used to handle asynchronous events like successful payments and subscription changes.
### Local Development
In local development, you can use the Stripe CLI to forward events to your local server.
Install Stripe CLI
```bash title="Terminal"
brew install stripe/stripe-cli/stripe
```
Login to Stripe
```bash
stripe login
```
Forward Events
```bash
stripe listen --forward-to localhost:3000/api/stripe/webhooks
```
The webhook secret is printed in the terminal. Copy it and add it to your environment variables.
```dotenv title=".env"
STRIPE_WEBHOOK_SECRET=whsec_...
```
Trigger Test Events
```bash
stripe trigger checkout.session.completed
stripe trigger customer.subscription.created
```
### Production
Go to [Stripe Webhooks Dashboard](https://dashboard.stripe.com/webhooks)
Add endpoint: `https://your-domain.com/api/stripe/webhooks`
Select events to listen for:
* `checkout.session.completed`
* `customer.subscription.created`
* `customer.subscription.updated`
* `customer.subscription.deleted`
Copy the webhook secret and add it to your environment variables.
```dotenv title=".env"
STRIPE_WEBHOOK_SECRET=whsec_...
```
## Webhook Events
The boilerplate handles these webhook events:
1. **Expedited Listings**
```ts title="app/api/stripe/webhooks/route.ts"
case "checkout.session.completed":
if (event.data.object.metadata?.tool) {
// Send out expedited email notification to the admin
}
if (event.data.object.metadata?.ads) {
// Schedule ad listing
}
break
```
2. **Featured Listings**
```ts
case "customer.subscription.created":
// Activate featured listing
break
case "customer.subscription.deleted":
// Deactivate featured listing
break
```
file: ./content/docs/integrations/rate-limiting.mdx
meta: {
"title": "Rate Limiting",
"description": "Learn how to set up and use Upstash Redis for efficient rate limiting"
}
Dirstarter uses [Upstash Redis](https://upstash.com) with their `@upstash/ratelimit` package for efficient rate limiting. This combination provides a serverless-friendly solution for protecting your APIs and routes from abuse.
> This integration is optional. If you don't want to use rate limiting, you can skip this section.
## Upstash Redis
Upstash Redis is a serverless Redis database that offers:
* Serverless architecture
* Global distribution
* TypeScript support
* Built-in rate limiting
* Edge compatibility
* Pay-per-use pricing
### Setup
1. Create an Upstash account at [upstash.com](https://upstash.com)
2. Create a new Redis database
3. Get your Redis URL and token from the dashboard
4. Add the following environment variables:
```dotenv title=".env"
REDIS_REST_URL=your_redis_url
REDIS_REST_TOKEN=your_redis_token
```
### Alternative Redis Hosting
While Upstash is our recommended choice, you can use any Redis provider that supports the REST API. Here are some popular options:
1. [**Self-hosted Redis**](https://redis.io/downloads/)
2. [**Redis Cloud**](https://redis.io/cloud/)
3. [**DigitalOcean Redis**](https://www.digitalocean.com/products/managed-databases-redis)
When using a non-Upstash Redis provider, make sure it supports the REST API and has proper authentication. Some providers might require additional configuration or have different connection string formats.
### Usage
The boilerplate provides a simple way to implement rate limiting:
```ts title="services/redis.ts"
import { Redis } from "@upstash/redis"
import { env } from "~/env"
export const redis = new Redis({
url: env.REDIS_REST_URL,
token: env.REDIS_REST_TOKEN,
})
```
### Implementation
The boilerplate includes pre-configured rate limiters for different actions:
```ts title="lib/rate-limiter.ts"
import { Ratelimit } from "@upstash/ratelimit"
import { redis } from "~/services/redis"
const limiters = {
submission: new Ratelimit({
redis,
analytics: true,
limiter: Ratelimit.slidingWindow(3, "24 h"), // 3 attempts per day
}),
report: new Ratelimit({
redis,
analytics: true,
limiter: Ratelimit.slidingWindow(3, "1 h"), // 3 attempts per hour
}),
newsletter: new Ratelimit({
redis,
analytics: true,
limiter: Ratelimit.slidingWindow(3, "24 h"), // 3 attempts per day
}),
claim: new Ratelimit({
redis,
analytics: true,
limiter: Ratelimit.slidingWindow(5, "1 h"), // 5 attempts per hour
}),
}
```
Use the rate limiter in your server actions:
```ts title="app/actions/submit.ts"
import { isRateLimited } from "~/lib/rate-limiter"
export async function submitAction() {
const ip = await getIP()
const rateLimitKey = `submission:${ip}`
if (await isRateLimited(rateLimitKey, "submission")) {
throw new Error("Too many submissions. Please try again later.")
}
// Your submission logic here
}
```
file: ./content/docs/integrations/storage.mdx
meta: {
"title": "Storage",
"description": "Learn how to set up and use Amazon S3 for file storage and media handling"
}
Dirstarter uses [Amazon S3](https://aws.amazon.com/s3/) for file storage and media handling, providing a reliable and scalable solution for storing images, screenshots, and other media files.
## Amazon S3
Amazon S3 is a cloud storage service that offers:
* High availability and durability
* Global distribution
* Pay-per-use pricing
* Built-in CDN integration
* Fine-grained access control
* Versioning and lifecycle management
### Setup
#### Create an AWS account
Go to [aws.amazon.com](https://aws.amazon.com) and create an account.
#### Create a new **S3 bucket**:
Navigate to the [S3 service](https://console.aws.amazon.com/s3/)
Create a new bucket with the following options:
* Pick globally unique bucket name (e.g., `your-project-name`)
* Select a region **close to your target audience**
* **Disable "Block all public access"** (very important if you want files to be publicly accessible)
* Bucket versioning: Optional, enables version control for files
Click **"Create bucket"**
Add a **bucket policy** to allow public access. Go to the **Permissions** tab and add the following policy:
```json
{
"Version": "2012-10-17",
"Statement": [
{
"Sid": "PublicReadGetObject",
"Effect": "Allow",
"Principal": "*",
"Action": "s3:GetObject",
"Resource": "arn:aws:s3:::your-project-name/*"
}
]
}
```
#### Create an **IAM user** with S3 access:
Navigate to the [IAM service](https://console.aws.amazon.com/iam/)
Create a new policy:
* Select S3 as the service
* Add permissions: `GetObject`, `PutObject`, `DeleteObject`, `ListBucket`
* Limit the resources to your bucket: `arn:aws:s3:::your-project-name/*`
Example policy:
```json
{
"Version": "2012-10-17",
"Statement": [
{
"Effect": "Allow",
"Action": [
"s3:PutObject",
"s3:GetObject",
"s3:DeleteObject",
"s3:ListBucket"
],
"Resource": "arn:aws:s3:::your-project-name/*"
}
]
}
```
Create a new **IAM user**:
* Select "Programmatic access"
* Attach the policy you created
Save the **Access Key ID** and **Secret Access Key**
#### Add the following environment variables:
```dotenv title=".env"
S3_BUCKET=your-project-name
S3_REGION=your-region
S3_ACCESS_KEY=your_access_key
S3_SECRET_ACCESS_KEY=your_secret_key
```
## S3-Compatible Alternatives
While Amazon S3 is our recommended choice, you can use any S3-compatible storage service. Here are some popular alternatives:
1. [**Cloudflare R2**](https://www.cloudflare.com/products/r2/)
2. [**DigitalOcean Spaces**](https://www.digitalocean.com/products/spaces/)
3. [**Backblaze B2**](https://www.backblaze.com/b2/cloud-storage.html)
4. [**Google Cloud Storage**](https://cloud.google.com/storage)
When using a non-AWS S3 provider, make sure to update the endpoints in `lib/media.ts` to the correct endpoint URL.
## Media Handling
The boilerplate includes a comprehensive media handling system in `lib/media.ts`:
```ts title="lib/media.ts"
import { Upload } from "@aws-sdk/lib-storage"
import { s3Client } from "~/services/s3"
export const uploadToS3Storage = async (file: Buffer, key: string) => {
const upload = new Upload({
client: s3Client,
params: {
Bucket: env.S3_BUCKET,
Key: key,
Body: file,
StorageClass: "STANDARD",
},
queueSize: 4,
partSize: 1024 * 1024 * 5,
leavePartsOnError: false,
})
return await upload.done()
}
```