Authentication
Learn how authentication works in Dirstarter, including BetterAuth setup, providers, user management, and security
Dirstarter uses BetterAuth for authentication, providing a flexible and secure system with multiple authentication methods and role-based access control.
Core Features
- Magic Link authentication with Resend integration
- Social login providers (Google)
- Role-based access control (admin/user)
- Session management
- User management interface
Setup
The following environment variables are required:
BETTER_AUTH_SECRET=your_secret_key // Random string
BETTER_AUTH_URL=http://localhost:3000
You can generate a random string for the secret key using openssl rand -base64 32.
For every OAuth provider you want to use, you need to set the clientId and clientSecret provider variables.
# Google OAuth
AUTH_GOOGLE_ID=your_google_client_id
AUTH_GOOGLE_SECRET=your_google_client_secret
Follow the BetterAuth documentation for more information where to find the clientId and clientSecret.
Basic Configuration
Authentication is configured in lib/auth.ts:
import { betterAuth } from "better-auth/minimal"
import { nextCookies } from "better-auth/next-js"
import { admin, magicLink, oneTimeToken } from "better-auth/plugins"

export const auth = betterAuth({
  database: prismaAdapter(db, { provider: "postgresql" }),

  secondaryStorage: redis
    ? {
        get: async key => { /* ... */ },
        set: async (key, value, ttl) => { /* ... */ },
        delete: async key => { /* ... */ },
      }
    : undefined,

  socialProviders: {
    google: {
      clientId: env.AUTH_GOOGLE_ID,
      clientSecret: env.AUTH_GOOGLE_SECRET,
    },
  },

  session: {
    freshAge: 0,
    cookieCache: { enabled: true },
  },

  account: {
    accountLinking: { enabled: true },
  },

  onAPIError: {
    onError: error => { /* ... */ },
  },

  plugins: [
    magicLink({
      sendMagicLink: async ({ email, url }) => {
        // Sends a magic link email using Resend
        // ...
      },
    }),

    oneTimeToken(),
    admin(),

    // must be the last plugin
    nextCookies(),
  ],
})
For a full list of available configuration options, plugins and providers see the BetterAuth documentation.
Authentication Methods
By default, Dirstarter includes 2 authentication methods: Magic Link and Google Login.
Adding Authentication Methods
BetterAuth supports a wide range of authentication methods, including more social providers, email/password, passkeys and more.
Magic Link
Magic Link authentication allows users to sign in without a password. When a user enters their email, they receive a secure link that automatically logs them in.
"use client"

import { useMagicLink } from "~/hooks/use-magic-link"

export function LoginForm() {
  const { form, handleSignIn, isPending } = useMagicLink()

  // Renders a form with email input that calls handleSignIn on submit
  // ...
}
Social Login
Social login is supported through OAuth providers. Currently configured for Google:
"use client"

import { signIn } from "~/lib/auth-client"

export function LoginButton({ provider }: { provider: "google" | "github" }) {
  const callbackURL = useAuthCallbackUrl()

  const handleSignIn = () => {
    signIn.social({ provider, callbackURL })
  }

  // ...
}
User Roles
Dirstarter implements two user roles:
admin: Full access to all features and user managementuser: Standard user access
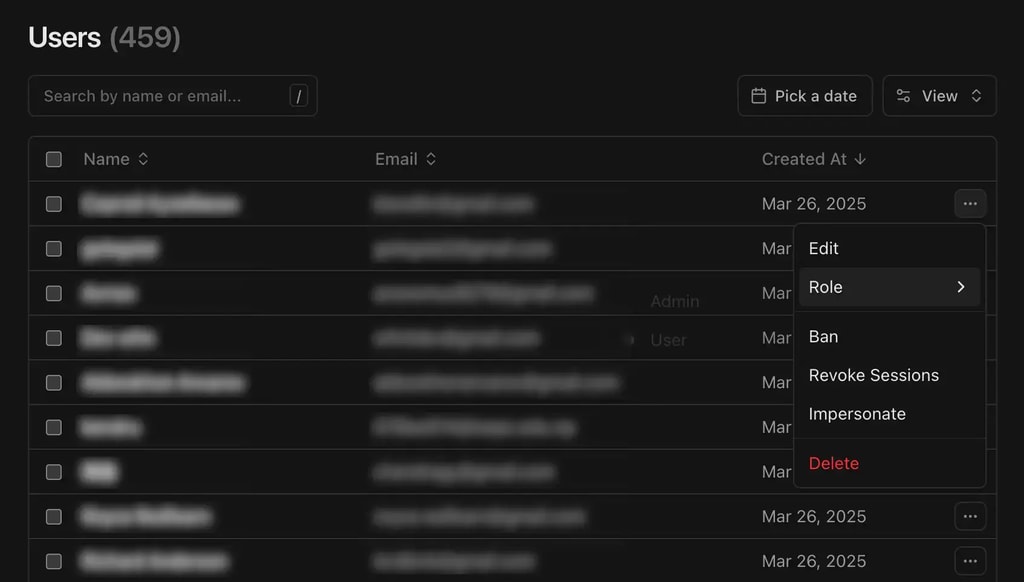
User Management
Admins have access to various user management actions:
- Edit user details
- Change user roles
- Ban/unban users
- Revoke user sessions
- Delete users
Protecting Routes and Actions
Route Protection
The dashboard lives at /app, a single permission-gated workspace for every signed-in user.
The legacy /admin and /dashboard URLs 308-redirect into /app so old bookmarks keep
working. Because these are static redirects, they live in next.config.ts rather than the
middleware:
async redirects() {
  return [
    { source: "/admin/:path*", destination: "/app/:path*", permanent: true },
    { source: "/dashboard/:path*", destination: "/app/:path*", permanent: true },
  ]
}
proxy.ts then performs only optimistic redirects. It reads the session cookie's presence
(never the database) and sends anonymous visitors to the login page:
export const config: ProxyConfig = {
  matcher: ["/app/:path*", "/auth/:path*", "/submit"],
}

// Optimistic check — send anonymous users to the login page.
if (!sessionCookie && (isAppPage || isSubmitPage)) {
  return NextResponse.redirect(new URL(`/auth/login?next=${pathname}${search}`, req.url))
}
Middleware should only perform optimistic checks. It can be bypassed and runs on every request, so never read the database or treat it as your authorization boundary. Enforce auth and roles in the route segments themselves (and on the server procedures).
The authoritative auth and role checks live in the /app route layouts, using the same
can() model as the procedures. A small guard wraps getServerSession() + can():
export const requireUser = async () => {
  const session = await getServerSession()
  if (!session?.user) redirect("/auth/login")
  return session.user
}

export const requirePermission = async (permission: Permission) => {
  const user = await requireUser()
  if (!can(user, permission)) redirect("/app")
  return user
}
The root app/app/layout.tsx calls requireUser() to gate the whole dashboard to signed-in
users. Each admin section then adds a tiny layout that requires its permission, which gates
that section's list, detail, and create pages in one place:
export default async function ({ children }: LayoutProps<"/app/users">) {
  await requirePermission("users.read")
  return children
}
Action Protection
Dirstarter uses oRPC for type-safe server procedures.
Every procedure is built from one of two builders in server/orpc/procedure.ts:
publicProcedure— anonymous-reachable (a public permission, or none);context.usermay benullauthedProcedure— requires a signed-in user;context.useris non-null in the handler
Authorization is declared on the procedure via .meta() and enforced by a single permission
gate — there is no separate auth-middleware layer to choose from. meta.permission is evaluated
with can(user, permission) (server/orpc/permissions.ts); roles and grants live in
server/orpc/roles.ts. Rate limits are declared the same way via meta.rateLimit.
import { authedProcedure, publicProcedure } from "~/server/orpc/procedure"

export const tools = {
  // Public read — anonymous allowed, `context.user` may be null
  search: publicProcedure
    .meta({ permission: "tools.read" })
    .input(toolSearchSchema)
    .handler(({ input }) => searchTools(input)),

  // Authenticated — `context.user` is guaranteed non-null; limited to 3 requests/day
  submit: authedProcedure
    .meta({ permission: "tools.submit", rateLimit: { points: 3, duration: 60 * 60 * 24 } })
    .input(toolSubmitSchema)
    .handler(({ input, context: { user } }) => createTool({ ...input, ownerId: user.id })),
}
A non-public permission already rejects anonymous callers in the gate, so authedProcedure
adds no new authorization — it only guarantees a non-null user. Permissions are role-based;
to let a role act on only its own rows, extend can() with an ownership check (see AGENTS.md).
See the oRPC documentation for more on middleware and metadata.
Client-Side Usage
Session Management
"use client"

import { useSession, signIn, signOut } from "~/lib/auth-client"

export function AuthButton() {
  const { data: session, isPending } = useSession()

  if (isPending) {
    return <div>Loading...</div>
  }

  if (session) {
    return <button onClick={() => signOut()}>Sign out</button>
  }

  return <button onClick={() => signIn.social({ provider: "google" })}>Sign in with Google</button>
}
Admin Checks
const { data: session } = useSession()

if (session?.user.role === "admin") {
  // Show admin UI
}
Email Templates
Magic link emails use React Email for beautiful, responsive templates:
type EmailMagicLinkProps = { url: string; email: string }

export function EmailMagicLink({ url, email }: EmailMagicLinkProps) {
  // Renders email with magic link button using EmailWrapper
  // ...
}
Always implement proper authorization checks on both the client and server to secure your application.
Last updated on